Camera in Action 働くカメラ
On this page, I will use SDF (signed distance function)-based demos from 3D Rendering with Ray Marching レイマーチングによる3Dレンダリング. The setup is quite complex compared to the other articles, but the only parts that change are the
mapfunction (where the 3D objects are placed in the scene) and the section after the comment//camera setupin themainfunction.このページでは、3D Rendering with Ray Marching レイマーチングによる3Dレンダリングのコードを基にしたSDF(符号付き距離関数)ベースのデモを使います。セットアップは他の記事と比べて複雑ですが、変更が必要な箇所は
map関数(3Dオブジェクトのシーン内配置)とmain関数内の//camera setupコメント以降の部分のみです。The goal of this page is to understand how cameras in 3D graphics work and how they can be configured in general, so you don’t need to understand the other details of the demo. You can find the corresponding settings and functions in various tools such as OpenFrameworks, Three.js, TouchDesigner, After Effects, Blender, etc. — almost anywhere the concept of camera is implemented.
このページの目的は3Dグラフィックスにおけるカメラの仕組みと一般的な設定の理解なので、デモの他の詳細な部分は理解できなくても問題ありません。OpenFrameworks、Three.js、TouchDesigner、After Effects、Blenderなど、カメラの概念を実装しているほぼすべてのツールで、これらの設定や機能に相当するものを見つけることができます。
Camera obscura
To understand how cameras work, let’s start from a pinhole camera, or camera obscura, which is the ancestor of cameras today. A camera obscura is basically a pinhole camera without a film. Camera obscura can come in different sizes, from a box you can hold to a room that you can go in. The name camera obscura means “dark room,” so let’s imagine a big one here.
カメラの仕組みを理解するために、まずはピンホールカメラ、または今のカメラの先祖にあたるカメラ・オブスクラから始めましょう。カメラ・オブスクラは、基本的にフィルムのないピンホールカメラのことです。手で持てる箱サイズから人が中に入れる部屋サイズまで、さまざまな大きさのものがあります。カメラ・オブスクラという名前は「暗い部屋」という意味なので、ここでは大きな部屋サイズのものを想像しましょう。
Inside a camera obscura it is very dark, with a single tiny hole in one wall. Light can only enter through this hole, creating an image of the outside on the opposite wall.
カメラ・オブスクラの中はとても暗く、壁に小さな穴が1つだけ開いています。光はこの穴からだけ入ってきて、反対側の壁に外の景色を映し出します。
The world outside is full of light. As we have seen when we are discussing environmental light, light bounces off and scatters around in all directions, and objects are lit by the light from all directions mixed together.
外の世界は光で満ちています。環境光についての議論で見たように、光はあらゆる向きに跳ね返って散らばり、あらゆる方向からの光が混ざり合って物体を照らしています。
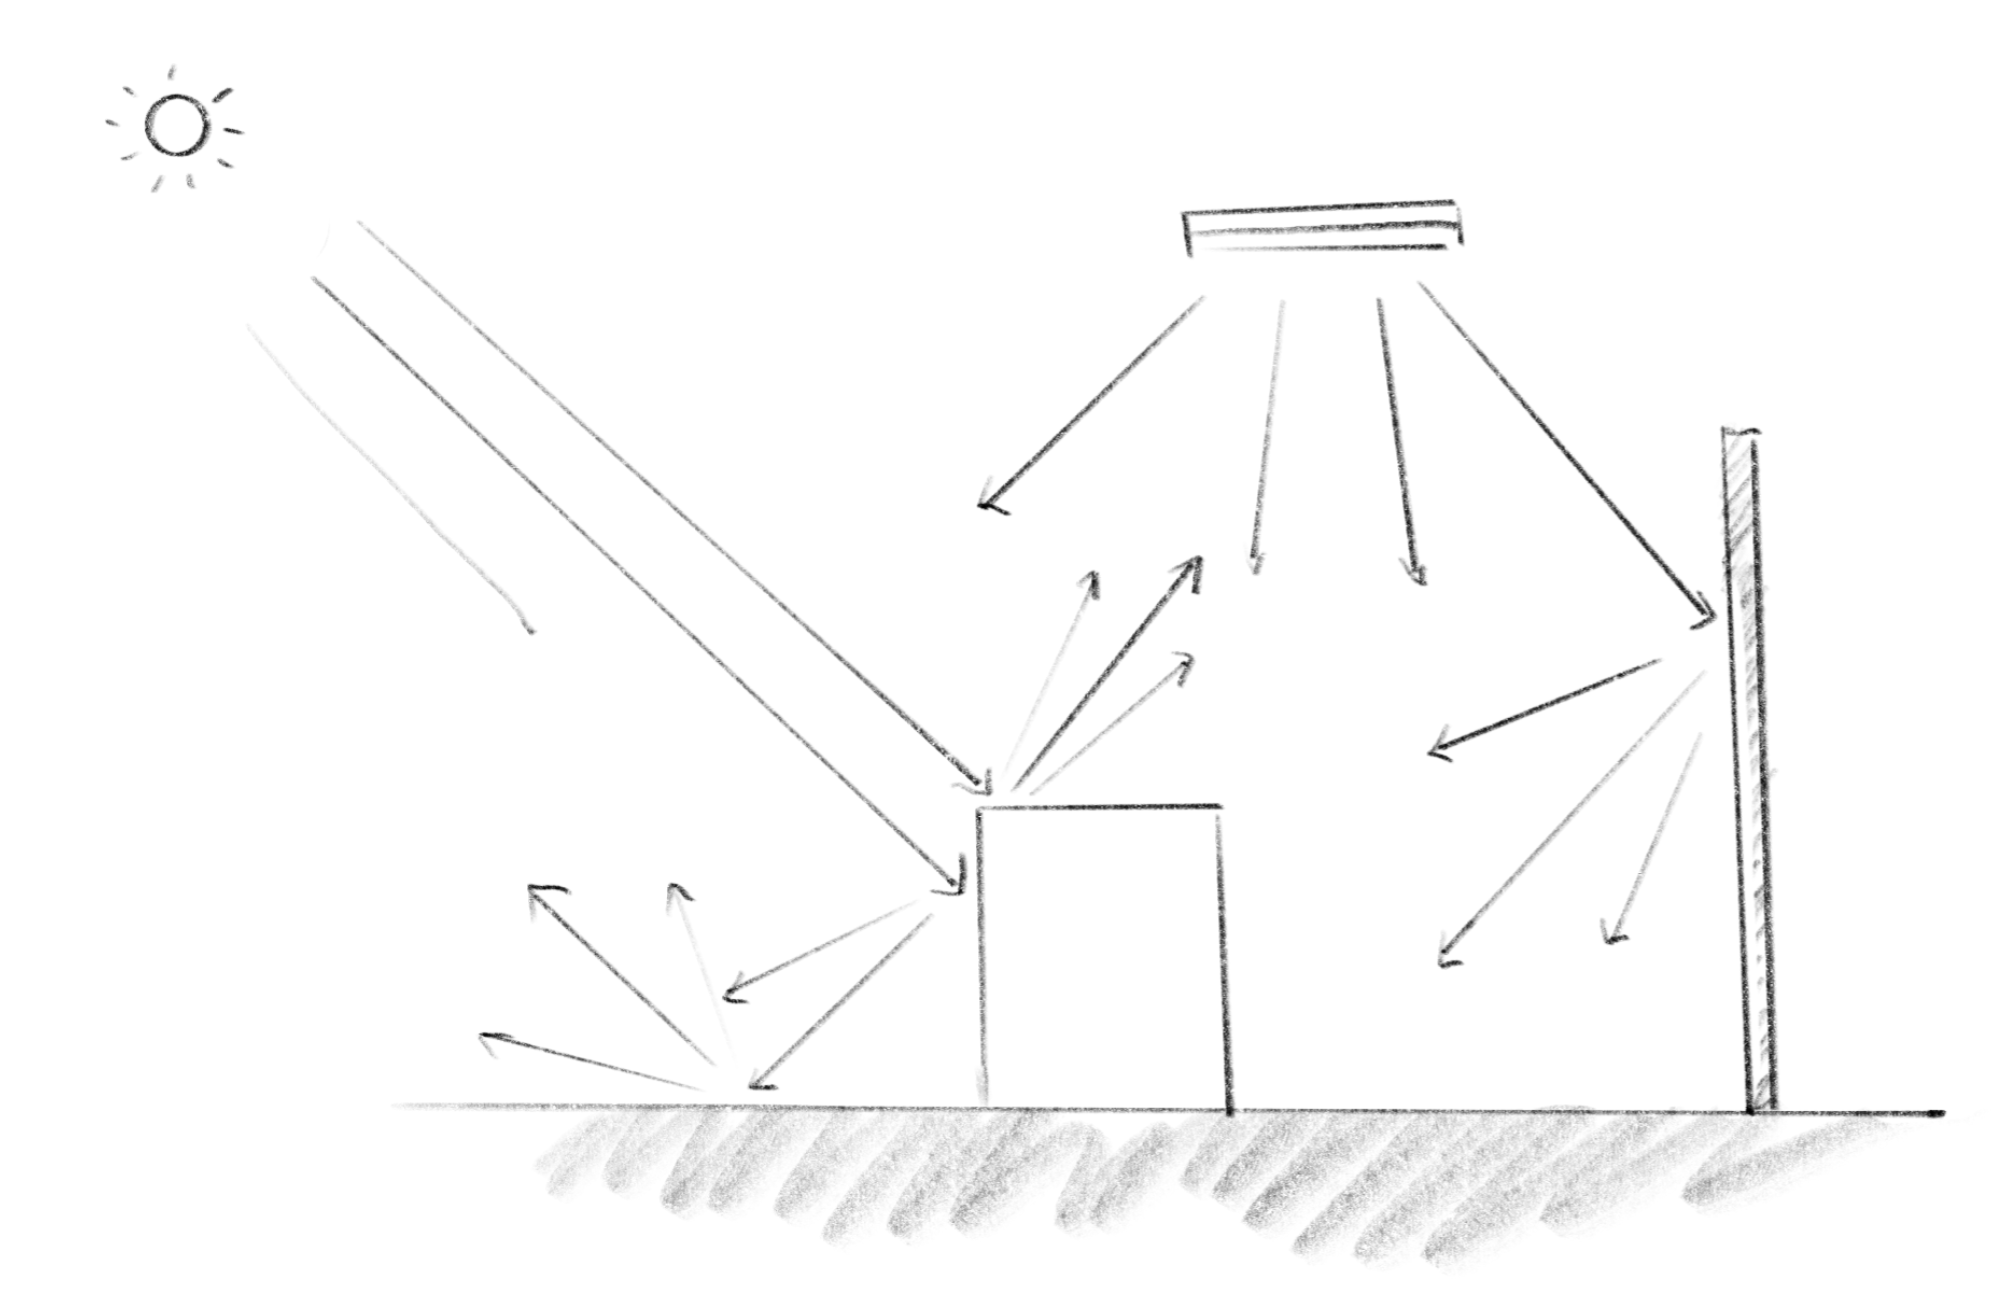
What the small hole does is filter out all the light except for the rays that go through the small hole. So in a camera obscura, from each point on the image on the wall, you can pinpoint where exactly the light comes from, or the other way around, only the light from a single direction from the outside will light that point. And this is how such a simple device can create a very clear image of the outside.
小さな穴は、その点を通過する光線以外のすべての光を遮断するので、カメラ・オブスクラの壁に映った像のそれぞれの点に対して、光がどこから来ているのか正確に特定できます。逆に言えば、外部からの光は、ある特定の向きからでないとその点を照らすことができません。簡単な装置で外の景色をはっきりと映し出せるのはこのためです。

First published picture of camera obscura, in Gemma Frisius’ 1545 book De Radio Astronomica et Geometrica, Public Domain
People used this to trace the image to create accurate pictures. Eventually, they invented a way to capture the image directly on a medium using different kinds of chemicals that react to the light, and that is the beginning of the camera as we know it today. The modern camera has far more complex sets of lenses and a digital sensor in the place of the film, but the fundamental mechanism is still exactly the same.
この像はトレースして正確な絵を描くために使われました。そのうちに光に反応する様々な化学物質を使って、像を直接媒体に定着させる方法が発明され、これが今のカメラの始まりとなりました。現代のカメラはより複雑なレンズのセットがあり、フィルムの代わりにデジタルセンサーを使っていますが、基本の仕組みは今でも全く同じです。
Focal depth and field of view
焦点深度と画角
In computer graphics, we often use a model where the screen is placed in front of the scene rather than behind the hole or the lens, but the idea is the same. Imagine a point called the focal point. If you draw a line from the focal point to a point on an object in the scene, where the line crosses the screen or the film is where the point appears in the final image. In the case of camera obscura, the pinhole is the focal point.
コンピューターグラフィックスでは、スクリーンを穴やレンズの後ろではなくシーンの前に置くモデルをよく使用しますが、基本的な考え方は同じです。ある一点を想像してこれを焦点と呼びます。焦点からシーンの中の物体の上の点まで線を引くと、その線とスクリーンやフィルムが交わる点が、最終的な画像上でのその点の位置となります。カメラ・オブスクラの場合、ピンホールが焦点となります。
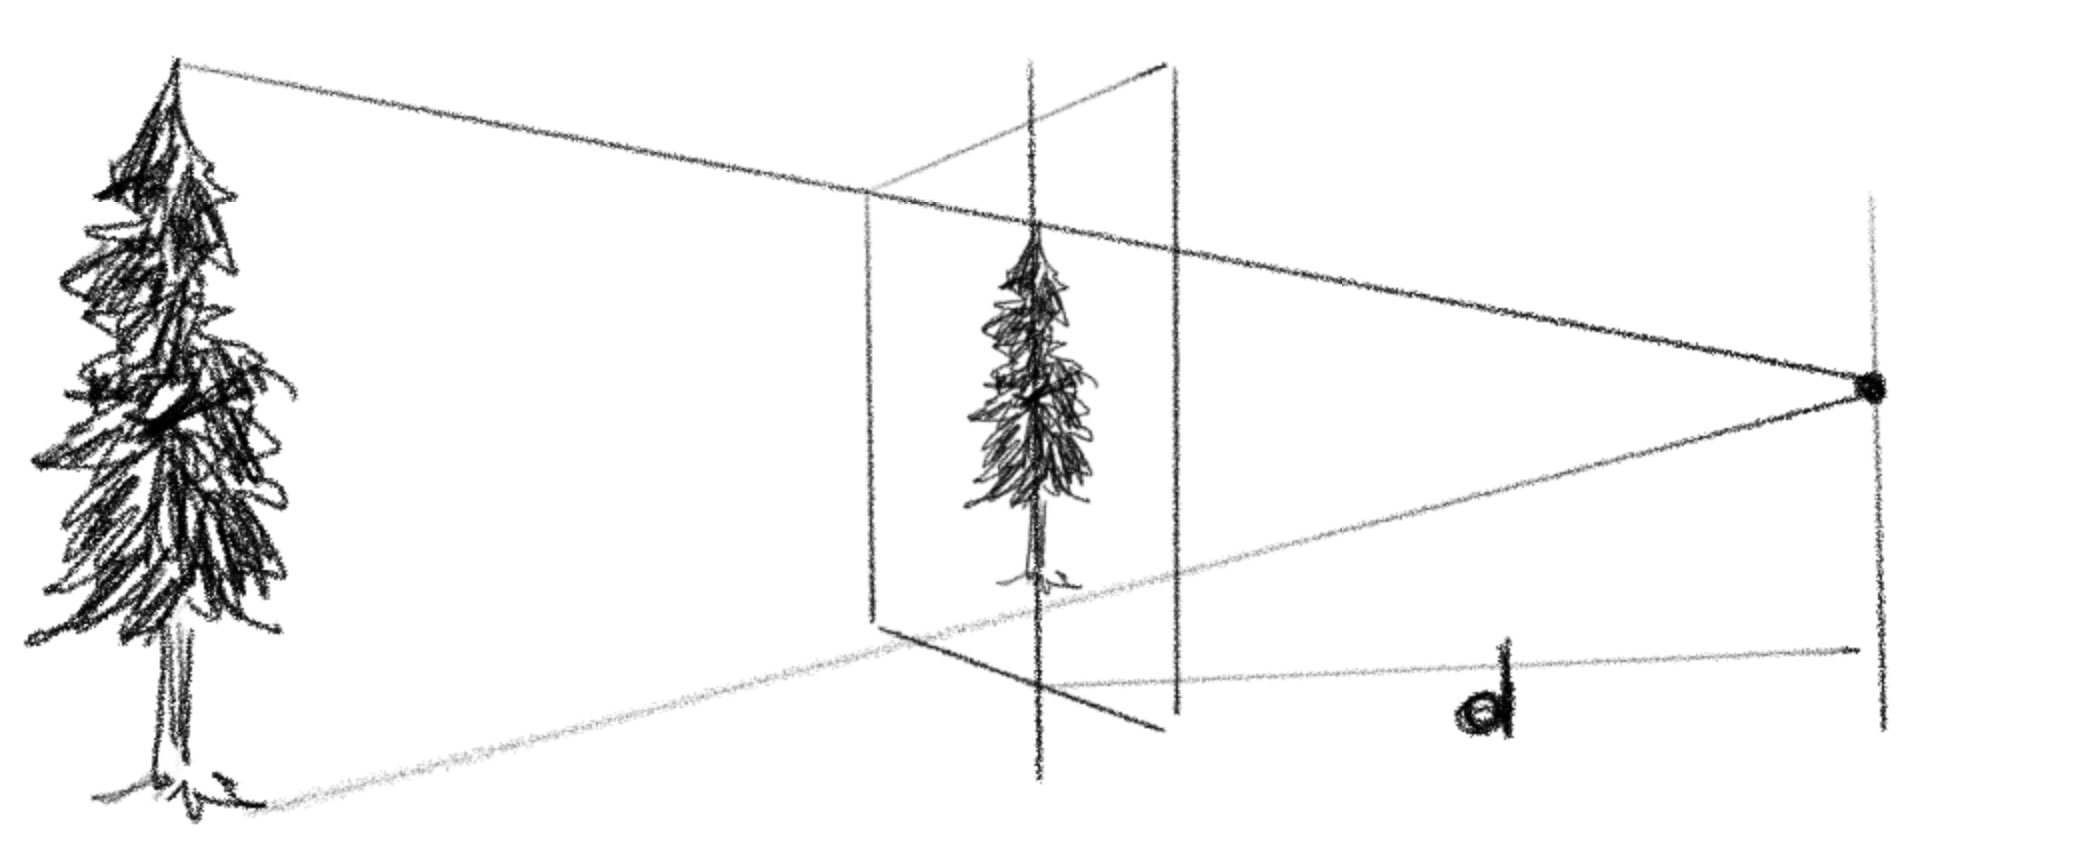
The distance from the focal point to the screen, wall, or the film is called the focal distance. This distance essentially defines the field of view, or how wide you can see in the result. If the size of the screen, etc., is the same, a longer focal length gives you a narrower view (zoomed in), and a shorter one gives you a wider view.
焦点から画面、壁、またはフィルムまでの距離を焦点距離と呼びます。この距離は基本的に画角、つまり結果としてどれだけ広く見えるかを決定します。画面などのサイズが同じ場合、焦点距離が長いと視野が狭く(ズームイン)なり、短いと視野が広くなります。
In a physical camera where size of the body is constrained, we can’t always change this distance easily or too much. Instead, we use lenses to bend the light to effectively emulate the result.
実際のカメラでは本体の大きさに制限があるので、この距離を簡単に調整したり大きく変更することができません。代わりに、レンズを使って光を屈折させることによって、同じような効果を実現しています。
Note that the focal distance only makes sense in relationship with the size of screen or film. Field of view is the angle that both ends of the screen and the focal point make. If the size of the screen is and the focal length is , the field of view (FOV) is:
焦点距離は、画面やフィルムのサイズとの関連性においてのみ意味をなします。画角とは、画面の両端と焦点が形成する角度のことです。画面の大きさを、焦点距離をとすると、画角(FOV)は次の式で表されます。
Changing the field of view changes the area you can see. The wider the view, the smaller the objects appear, and vice versa. This is what zooming in a camera does.
画角を変えると見える範囲が変わります。画角が広くなると物体が小さく見え、逆に狭くなると大きく見えます。これがカメラのズームの仕組みです。
The following part in the code is where it animates the field of view and sets the focal distance using the formula above. Try changing the FOV to see how it works.
このコードでは上の式を使って、画角を動かしながら焦点距離を設定しています。FOVを変えて、動作を確認してみましょう。
// fov
float fov = 60.0 + sin(time * PI / 6.0) * 30.0;
float depth = 1.0 / tan(radians(fov / 2.0));
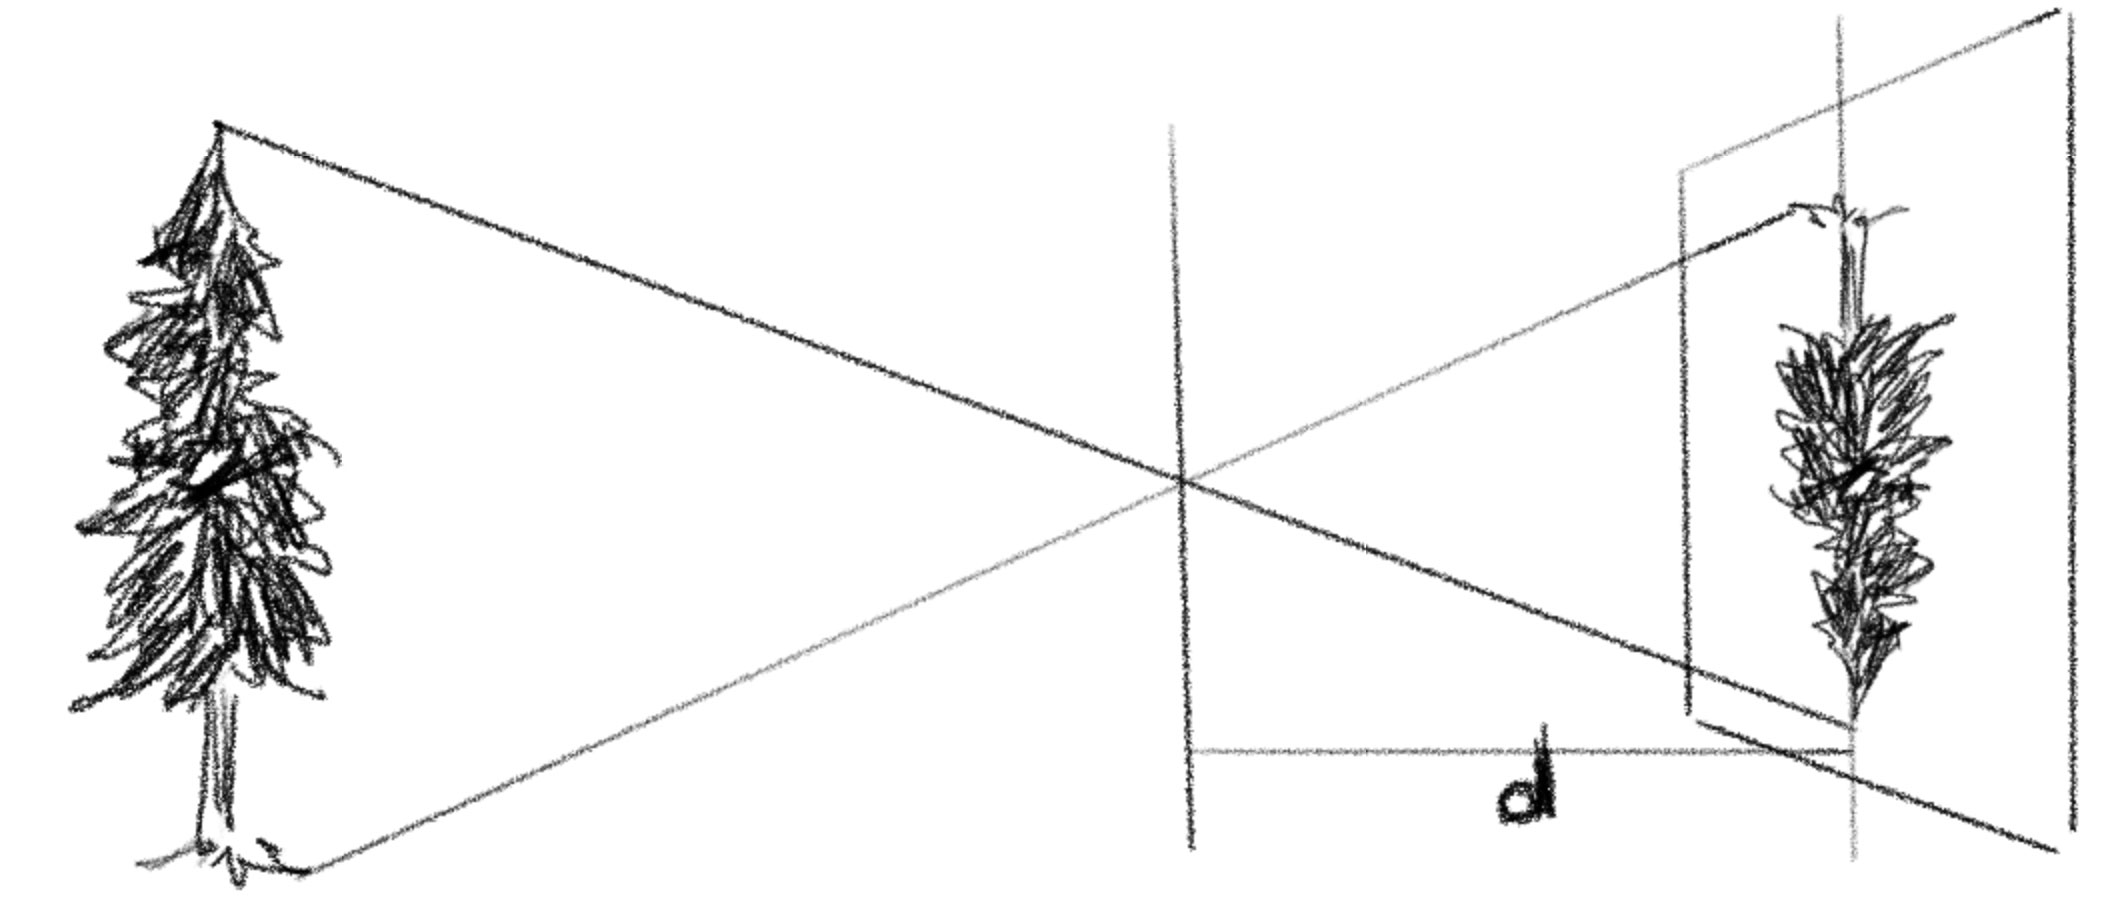
Compare the demo below with the one above. These might look very similar, but the one below actually moves the camera closer and further from the objects without changing the FOV. If you carefully look at the horseshoe-looking object, you’ll notice that it shows more of its side as the camera moves forward.
上のデモと下のデモを比較してみましょう。よく似ていますが、下のデモではFOVを変えずにカメラを物体に近づけたり遠ざけたりしています。馬蹄形の物体をよく見ると、カメラが前に動くほど側面がより多く見えています。
// camera	setup
vec3 cameraTarget = vec3(0.0, 0.5, 0.0);
vec3 cameraPosition = cameraTarget + vec3(0.0, 0.5, 4.5 + sin(time * PI / 6.0) * 2.0);

// fov
float fov = 30.0;
float depth = 1.0 / tan(radians(fov / 2.0));
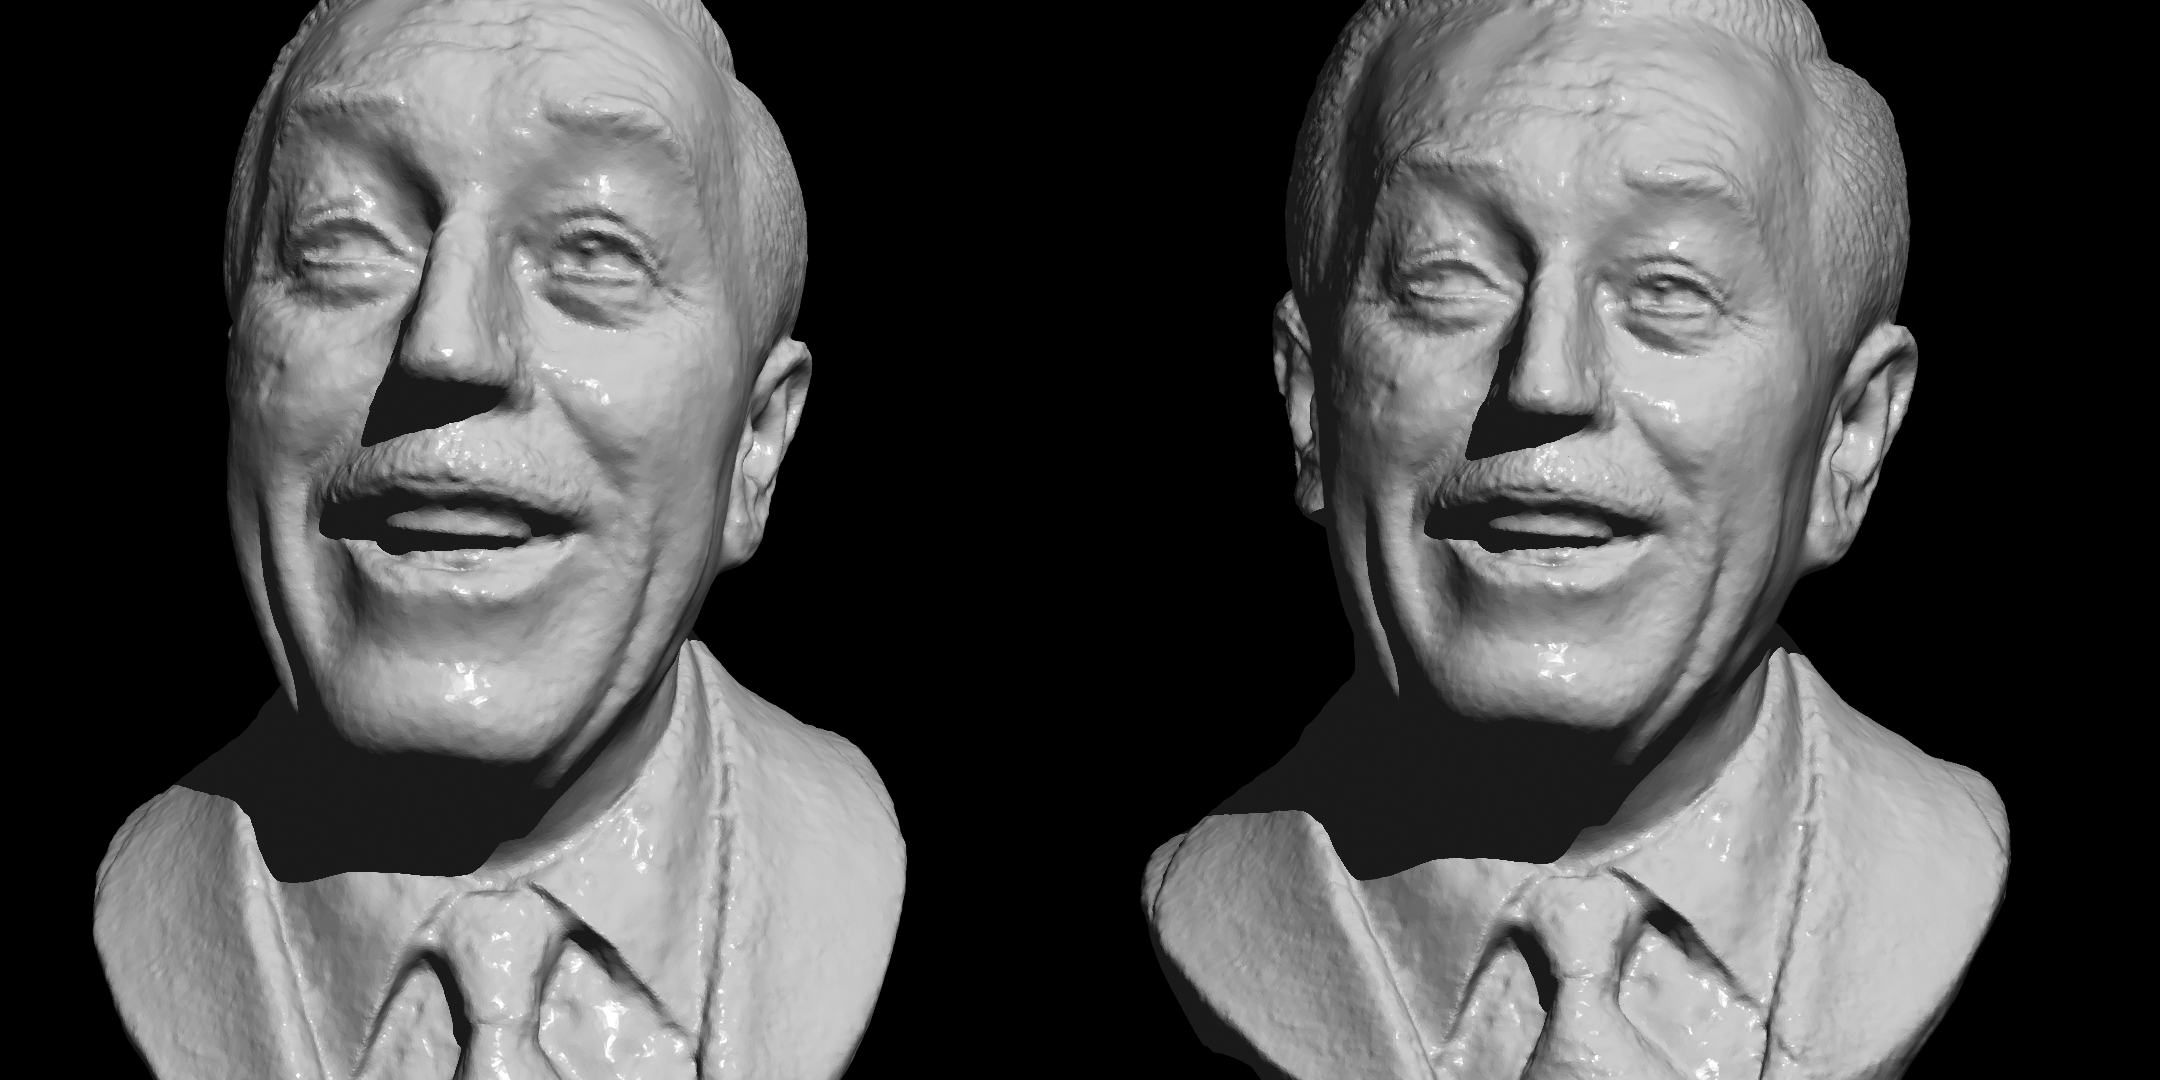
Below is another comparison. Two faces of Walt Disney are the exact same 3D model with the same lighting, but the one on the left is shot from very close with a wide-angle (wide-FOV) camera, and the one on the right is shot from far away with a narrow-angle (narrow-FOV) camera. You can see how this choice can completely change the impression of the image.
下の画像は別の比較です。ウォルト・ディズニーの顔はどちらも全く同じ3Dモデルで同じ照明を当てていますが、左側は広角(FOVが広い)カメラで近くから撮影し、右側は望遠(FOVが狭い)カメラで遠くから撮影しています。レンズの選び方で、画像の印象が全く変わってしまうことがわかります。
Camera Motion
カメラの動き
Camera motion is a key factor that determines the impression of your scene. The camera itself is an invisible but most important actor. Below are some common camera movement terms.
カメラの動きはシーンの印象を左右する重要な要素です。目には見えませんが、カメラは実は最も重要な役者なのです。以下では、カメラワークの一般的な用語を紹介します。
Pan
パン
Pan is probably the most common camera movement, which is rotating the camera horizontally to the right or left. I bet you are already doing this a lot with your phone.
パンは最も一般的なカメラワークの1つで、カメラを水平方向に左右に回転させる動作です。スマートフォンでの撮影でも日常的に使っているでしょう。
The demo below shows the camera panning between two objects at both ends. Changing the speed and easing can drastically change the impression from quickly turning around to slowly scanning through. Try tweaking the following part of the code and see what effect it makes.
下のデモでは、カメラが両端の2つのオブジェクト間をパンしています。速さとイージングを変えれば、素早い振り向きから、ゆっくり眺めるような動きまで、印象が大きく変えられます。下のコードの部分を調整して、様々な効果を試してみましょう。
// camera	setup
float t = fract(uTime / 4.0);
t = t < 0.5 ? t * 2.0 : (1.0 - t) * 2.0;
float cameraAngle = (powerInOut(t, 5.0) - 0.5) * PI * 0.5;
vec3 cameraTarget = vec3(cos(cameraAngle) * 5.0, 0.5, sin(cameraAngle) * 5.0);
vec3 cameraPosition = vec3(0.0, 0.5, 0.0);
In many tools, you can either select to directly rotate the camera or set a target position for the camera to look at. Setting the target is often much more intuitive.
多くのツールでは、カメラを直接回転させるか、カメラを向ける対象の位置を設定するかを選べます。多くの場合、対象位置を設定する方が直感的に操作できます。
Tilt
ティルト
Tilt is a vertical rotation of the camera. This is effective for conveying the height of something tall like a tower, and it’s often used when introducing a character to give them an overbearing impression.
カメラを垂直方向に回転させる動きをティルトと呼びます。塔のような高い建物の高さを表現したり、人物を威圧的に見せるために多く使われます。
In the demo below is a scrappy character made with the same shapes as in the pan example. Though it doesn’t have a face or any details, the camera motion alone can make it look big and possibly angry. If you do the opposite and place the camera above and a little far from the character and make it look down, it will appear small. Try this by tweaking the following part of the code.
下のデモでは、パンの例と同じ形で雑に作ったキャラクターを用意しました。顔や細部の表現が無くても、カメラワークだけでキャラクターを大きく、怒っているかのように見せることができます。反対に、カメラを上の方に置いて少し離れた位置から見下ろすようにすると、キャラクターは小さく見えます。下の部分のコードを調整して試してみましょう。
  // camera	setup
  float t = fract(uTime / 4.0);
  vec3 cameraTarget = vec3(0.0, 0.6 + sin(t * PI * 2.0) * 0.5 , 0.0);
  vec3 cameraPosition = vec3(0.0, 0.2, 2.0);
Tracking
トラッキング
Tracking means to chase a moving target by panning, tilting, or both with a camera.
トラッキングとは、カメラのパンやティルト、または両方を使って動く被写体を追いかけることです。
A useful tip when tracking an object with code is to add a slight delay to the camera movement. When tracking an object by hand, it is impossible to perfectly keep the target in the same position in the view, especially when it is quick and unpredictable like a small animal.
コードで何かをトラッキングする際のコツとして、カメラの動きを少し遅らせてみましょう。手で対象を追いかける場合、特に小動物のように素早く予測不可能な動きをする被写体を画面内の同じ位置に完璧に捉え続けるのは不可能です。
Compare the two examples below. The one above tracks the object perfectly in the center, while in the one below, the camera motion lags slightly behind the object. The top one is not wrong and can be effective, but the one below looks more natural.
下の2つの例を比べてみましょう。上の例では対象物を完璧に中央に捉え続けていますが、下ではカメラが対象物に少し遅れています。上の例が間違っているわけではなく、効果的なこともありますが、下の例の方がより自然に見えます。
Camera Translation
カメラの移動
Of course you can move the camera itself. In filmmaking, people use various tools and equipment to move the camera in different ways. A boom is a lever-like pole that moves a camera up and down, while a truck or dolly is a rail system that moves the camera left and right or back and forth. Helicopters are commonly used for shooting cities or landscapes from a bird’s-eye view, and drones have become very common too and much more affordable.
もちろん、カメラ自体を移動することもできます。映画制作では、さまざまな道具や機材を使って多彩なカメラワークを実現します。ブームはカメラを上下に動かすてこ状の棒で、トラックやドリーはカメラを左右・前後に移動させるレールシステムです。ヘリコプターは都市や風景の空撮によく使われ、ドローンも一般的でより手軽に利用できるようになりました。
The demo below is a simple example of the camera moving left and right. The scene is exactly the same as the panning example above. Compare and see how they feel different.
下のデモは、カメラが単純に左右に動く例です。シーンは先ほどのパンの例と全く同じです。両者を比べて、印象の違いを見てみましょう。
Dolly Zoom
ドリーズーム
Dolly is the name of a tool to move a camera back and forth, and also a technique to move the camera that way. Because we have already seen this in the beginning, let’s add one more nuance to it.
ドリーは、カメラを前後に移動させる機材の名前で、そうしたカメラワークの手法でもあります。この動きは既に冒頭で見たので、もう一つの要素を加えてみましょう。
Remember that the size of an object in the view can change based on both the field of view and the distance of the camera.
視野の中の被写体の大きさは、画角とカメラからの距離の両方によって変わることを思い出しましょう。
If we combine these two effects to work against each other, i.e., widen the field of view as the camera gets closer to the target, we can create an interesting effect in which the main subject stays the same size but the depth feels compressed and expanded.
これら2つの効果を互いに打ち消し合うように組み合わせる、つまりカメラが被写体に近づくにつれて画角を広げていくと、メインとなる被写体の大きさは変わらないまま、奥行きが圧縮されたり拡張されたりするような面白い効果を生み出すことができます。
This effect, called the dolly zoom, was famously used in Vertigo and Jaws to create uneasiness and tension in the scene.
この効果はドリーズームと呼ばれ、「めまい」や「ジョーズ」で使われたことで有名で、不安感や緊張感のあるシーンを生み出すために使われました。
Notice that the demo below directly sets the focal depth based on the distance of the camera from the target. This ensures that the main subject stays roughly the same size in the frame while the background changes.
下のデモでは、カメラと被写体との距離に基づいて焦点距離を直接設定しています。これにより、背景が変化する一方で、主要な被写体はフレーム内でほぼ同じ大きさを保ち続けます。
float depth = distance(cameraTarget, cameraPosition);
To learn more
もっと学ぶために
The examples above are not exhaustive, but rather a simple starting set. I recommend observing camera motion the next time you watch a movie or drama. Try imagining where the camera is and how the whole scene might look to someone seeing it from the side or other angles. It can be a tiring exercise, but it can be pretty fun and you will learn a lot.
上記の例は全てを網羅したわけではなく、入門用の基本的なセットです。次に映画やドラマを見るときは、カメラの動きを観察してみることをお勧めします。カメラがどこに置かれているのか、また横や別の角度から見たときにシーン全体がどのように見えるのかを想像してみましょう。少し疲れる作業かもしれませんが、とても楽しく、きっと多くのことを学べるはずです。
“Film Directing: Shot by Shot” is a classic book full of diagrams, drawings and storyboards from famous movies like Hitchcock’s The Birds, Blade Runner, etc. A great reference for thinking about how to design scenes.
「Film Directing: Shot by Shot」は、ヒッチコックの「鳥」や「ブレードランナー」などの有名な映画からの図解や、イラスト、絵コンテが豊富な古典です。シーンをどのようにデザインするかを考える上で、とても参考になります。

