Drawing Landscape 風景を描く
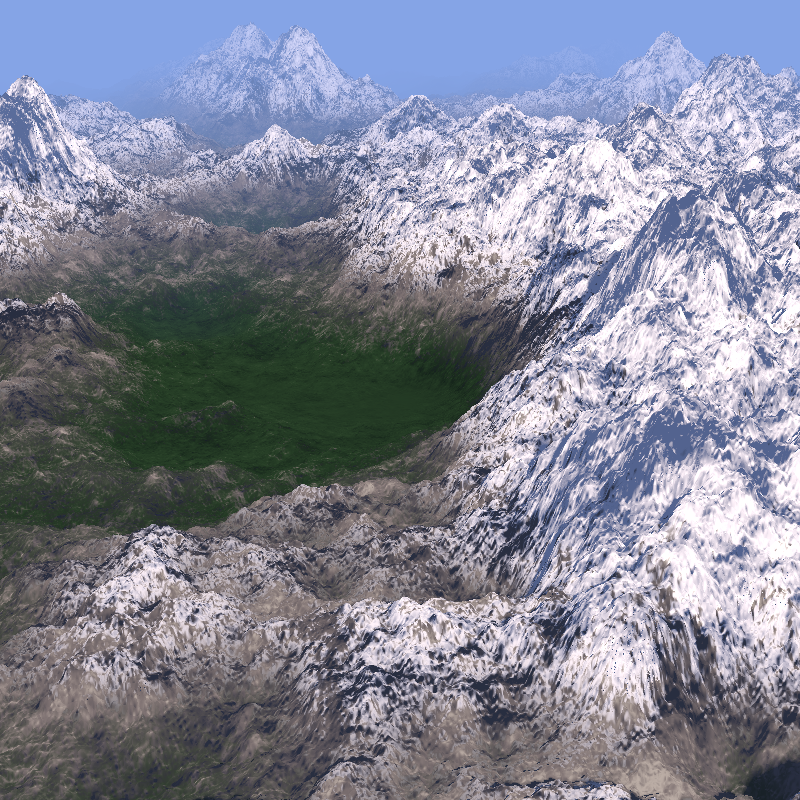
On this page, we will sketch a landscape like this using ray marching. Drawing shapes beyond simple geometries can provide very useful insights into applying the technique to anything.
このページでは、レイマーチングを使って下のような風景をスケッチします。単純で幾何学的な形でないものを描くことで、このテクニックをさまざまな対象に応用する際にとても役立つ知見が得られるでしょう。
I tried to keep the code as simple as possible while maintaining a good amount of details, but this page is still quite technical. If you are not familiar with 3D rendering with the ray marching technique, I recommend reading the following pages first.
十分なディテールを残しながらコードをシンプルに保つようにしましたが、それでもこのページはかなりテクニカルです。レイマーチングを使った3Dレンダリングに馴染みがない方は、まず以下のページを読むことをお勧めします。
Signed distance functions 符号付き距離関数
Projection and 3D Rendering プロジェクションと3Dレンダリング
Reading “Raymarching - Primitives”
I also used Inigo Quilez’s Shadertoy demo as a reference for writing this page. I highly recommend watching his video below, and hope that this page can help with understanding the demo code too.
このページを書くにはInigo Quilezのshadertoyデモも参考にしました。下の動画もぜひ見てください。このページがコードを読み解く役に立てばと思います。
Defining the terrain
地形の定義
First, we need to define the terrain. We can use multiple layers of noise to create intricate ups and downs of the mountains.
まずは地形を定義します。複数のノイズのレイヤーを重ねると、山が連なった複雑な起伏を作り出せます。
The noise function I’m using here is based on an example from The Book of Shaders, but with a little tweak. To apply lighting to the surface, we need to know the direction of the surface at each point, i.e., normal. To calculate this, the noised function in the demo below returns not only the noise value but also the derivatives of the value along x and y axes, i.e., gradient of the surface. In the return value, the x component represents the noise value, while y and z represent the gradient.
ここでのノイズ関数はThe Book of Shadersからの例をもとに、少し変更を加えています。形の表面にライティングを加えるには、各点における面の方向(法線)を求める必要があります。下のデモのnoised関数はこの計算のために、ノイズの値だけでなく、xとy軸に沿った値の微分、つまり表面の勾配も返します。戻り値のx成分がノイズ値を表し、yとz成分が勾配を表します。
vec3 noised(in vec2 st) {
    vec2 i = floor(st);
    vec2 f = fract(st);

    float a = random(i);
    float b = random(i + vec2(1.0, 0.0));
    float c = random(i + vec2(0.0, 1.0));
    float d = random(i + vec2(1.0, 1.0));

    vec2 u = f * f * (3.0 - 2.0 * f); // smoothstep(f)
    vec2 du = 6.0 * f * (1.0 - f);    // derivative of smoothstep(f)

    float value = mix(a, b, u.x) +
                  (c - a) * u.y * (1.0 - u.x) +
                  (d - b) * u.x * u.y;

    float dx = (b - a) * du.x * (1.0 - u.y) +
               (d - c - b + a) * du.x * u.y;

    float dy = (c - a) * du.y * (1.0 - u.x) +
               (d - b - c + a) * du.y * u.x;

    return vec3(value, dx, dy);
}
Then, the fbmd (stands for “Fractal Brownian Motion with Derivatives”) function layers the noises multiple times, scaling and rotating them to create everything from the overall shape to detail bumps and crevices of the terrain in a fractal manner.
次に、fbmd(“Fractal Brownian Motion with Derivatives”の略)関数が、ノイズに対してスケーリングと回転を繰り返し重ねることで、地形の全体的な形から細かな凹凸や裂け目まで、フラクタル のような形で作り出します。
vec3 fbmd( in vec2 st )
{
    const mat2 rot = mat2(0.8,  0.6, -0.6,  0.80 );
    float freqMult = 1.9;
    float sum = 0.0;
    float amt = 0.5;
    float amtMult = 0.55;
    vec2 grad = vec2(0.0);
    mat2 m = mat2(1.0); // Jacobian for rotating derivatives

    for( int i = 0; i < 9; i++ )
    {
        vec3 n = noised(st); // value, dx, dy
        sum += amt * n.x;
        grad += amt * (m * n.yz); // chain rule

        m = freqMult * rot * m;
        amt *= amtMult;
        st = freqMult * rot * st;
    }

    return vec3(sum, grad); // x = value, y = dx, z = dy
}
On the left side of the demo is the visualization of the noise value (x component), and the right side is the visualization of the gradient (yz components)
デモの左側はノイズの値(x成分)、右側は勾配(yz成分)をビジュアルにしたものです。
We can apply further modification to the data. Here, the terrain function is adjusting the height so that the mountains are taller closer to the center. Note that we are multiplying the gradient with the same factor so that we get the correct normals.
データにもう少し調整を加えましょう。terrain関数では、中心に近いほど山が高くなるように高さを調整しています。正しい法線が得られるように、勾配にも同じ係数を掛けていることに注意してください。
vec3 terrain(vec2 st)
{
    vec3 f = fbmd(st);

    float dist = length(st);
    float heightMult = mix(1.0, 0.5, smoothstep(0.0, 15.0, dist));
    heightMult = mix(0.0, heightMult, f.x);
    float height = f.x * heightMult;
    vec2 grad = f.yz * heightMult;

    return vec3(height, grad);
}
Ray marching
レイマーチング
Now that we have our terrain, let’s render it with ray marching. The basic is the same as ray marching with SDF (Signed distance function). We shoot rays from camera, and see where they hit objects.
地形ができたので、レイマーチングでレンダリングしましょう。基本的な手順はSDF (Signed distance function)を使ったレイマーチングと同じです。カメラからレイを飛ばし、物体との交差を調べます。
But there are a few key differences.
-
SDF returns the distance to the surface of the object. But the terrain defined by the noise doesn’t. There is no easy way to calculate the distance to the closest point on the surface.
-
So we use the height of the surface at the same xy coordinate as the current ray position as the reference point.
-
If z (height) of the ray is close enough to the reference point, we consider the ray has hit the surface at that point, stop the marching, and return the distance from the camera to the point (
if (d < 0.001) return t;) -
To move the ray forward, we also use the difference between the ray and the reference point. To avoid moving the ray too far, we check the gradient of the surface at the point too, and slow it down depending on how steep the surface is (
float safety = 0.75 / (1.0 + gradMag * 4.0);)
ただし、重要な違いがいくつかあります。
-
SDFは物体の表面までの距離を返しますが、ノイズで定義された地形では、表面上の最近点までの距離を簡単に計算することができません。
-
そのため、レイの現在位置と同じxy座標における地形の高さを参照点として使用します。
-
レイのz座標(高さ)が参照点に十分近づいた場合、その点で表面との衝突が発生したと判定し、マーチングを終了してカメラからその点までの距離を返します(
if (d < 0.001) return t;)。 -
レイの前進にも、レイと参照点との差を利用します。レイが速く進みすぎないよう、その点での地形の勾配を確認し、表面の傾斜に応じて進行速度を調整します(
float safety = 0.75 / (1.0 + gradMag * 4.0);)。
These thresholds and adjustments are empirical rather than based on strict math. You may need to test case by case to find the values that work.
これらの閾値や調整は、厳密に数学ではなく経験則に基づいています。最適な値を見つけるには、状況に応じてテストする必要があるでしょう。
float raymarch(in vec3 ro, in vec3 rd)
{
    float t = 0.0;
    float tMax = 10.0;

    for (int i = 0; i < 200; i++)
    {
        vec3 pos = ro + rd * t;
        vec3 terrainVal = terrain(pos.xz);
        float h = terrainVal.x;
        float d = pos.y - h;

        if (d < 0.001) return t; // terrain hit
        if (t > tMax) return -1.0; // no hit, escaped to sky

        float gradMag = length(terrainVal.yz);
        float safety = 0.75 / (1.0 + gradMag * 4.0);
        t += d * safety;
    }

    return -1.0; // fallback: treat as sky
}
The demo below renders the scene by mapping the depth (i.e., the distance from the camera to the terrain) to grayscale. The darker areas are closer to the camera, and the lighter areas are further away.
このデモはシーンの深度(カメラから地形までの距離)をグレースケールで表現します。暗い部分はカメラに近い場所を、明るい部分は遠い場所を示しています。
Shading
シェーディング
Let’s add lights and materials to make it more realistic. The techniques here are similar to what we covered in Reading “Raymarching - Primitives”, but simplified - we will touch upon each one briefly. You can toggle the checkboxes in the demo below to see how each component affects the scene.
よりリアルな見た目にするため、ライトとマテリアルを追加しましょう。ここで使うテクニックはReading “Raymarching - Primitives”で解説したものに似ていますが、簡略化しています。以下で各要素を順に説明します。下のデモではチェックボックスを切り替えることで、それぞれの要素がシーンにどう影響するかを確認できます。
Base Color
ベースカラー
The terrainColor function determines the color of the terrain based on the height and normal to divide it into snow, rock, and woods.
Basically, the high-altitude areas get snow and the lower areas will be covered by woods. To make the transition more complex and realistic, the amount is adjusted by the surface slope, so that the steeper the area, the less snow or woods it has.
terrainColor関数は、高さと法線に基づいて地形を雪、岩、森に分け、色を決めます。
基本的に、標高が高い部分は雪に覆われ、低い部分は森に覆われます。変化をより自然にするため、表面の傾斜に応じて調整を加え、斜面が急なほど雪や森が少なくなるようにしています。
vec3 terrainColor(float height, vec3 normal)
{
    float slope = 1.0 - clamp(dot(normal, vec3(0.0, 1.0, 0.0)), 0.0, 1.0);
    float snow = smoothstep(0.2, 0.31, height - slope * 0.5);
    float rock = smoothstep(0.1, 0.31, height + slope * 0.5);

    vec3 snowColor = vec3(0.95, 0.95, 0.98);
    vec3 rockColor = vec3(0.24, 0.2, 0.2);
    vec3 woodsColor = vec3(0.02, 0.06, 0.02);
    float woodsWeight = 1.0 - rock - snow;
    return woodsWeight * woodsColor + rock * rockColor + snow * snowColor;
 }
Normal
法線
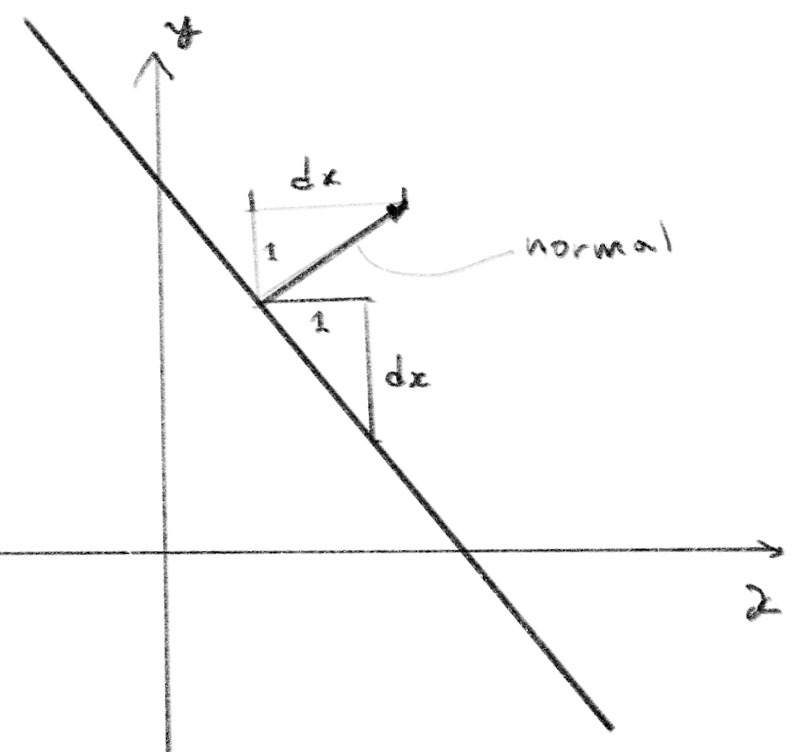
Because our terrain function returns the derivative, we can directly compute the normal of the surface for a given point. Remember that in the return value of the terrain function, the x component is the noise value, and the y and z components represent the gradient. In our 3D space, the noise value corresponds to the height which maps to the y-axis, while the gradient represents how the height changes along the x and z axes. The drawing below illustrates why this simple function works.
terrain関数は微分の値を返すため、各点の法線を直接計算できます。terrain関数の戻り値では、x成分がノイズ値を、yz成分が勾配を表していることを思い出してください。3D空間において、ノイズ値は高さを表現し、y軸に対応します。一方、勾配はxとz軸に沿った高さの変化を示します。下の図は、この単純な関数がなぜ正しい法線を求められるのかを示したものです。
vec3 normalAt(in vec2 st)
{
    vec3 n = terrain(st);
    return normalize(vec3(-n.y, 1.0, -n.z));
}
Sun light and Soft shadow
太陽光とソフトシャドウ
The sun is a parallel light from very far away. To simplify, I ignored the specular reflection in this demo and added only diffuse.
太陽光は遠く離れた場所からの平行な光です。簡略化のため、このデモでは鏡面反射(スペキュラー)を省略し、拡散光(ディフューズ)のみを追加しました。
// Sunlight
if (uSunlightEnabled) {
	float diffuse = max(dot(normal, lightDir), 0.0);
	float shadow = uShadowEnabled ? softShadow(pos, lightDir) : 1.0;
	color += baseColor * (diffuse * lightColor * shadow);
}
This part calculates the intensity of the diffuse light as the dot product of the normal and the direction of the light, then applies the soft shadow and slightly warm color of the sunlight. For the math for the diffuse light, take a look at Classic 3D Rendering 古典的 3D レンダリング. Soft shadow is explained in depth in this page: Soft shadow ソフトシャドウ
この部分では、法線と光の方向のドット積としてディフューズの強さを計算し、ソフトシャドウと、太陽光の少し暖かみのある色を適用します。ディフューズの数学的な説明については Classic 3D Rendering 古典的 3D レンダリング を見てください。ソフトシャドウについては、 Soft shadow ソフトシャドウで詳しく説明しています。
To calculate the specular reflection, we need different factors for different areas, as snow will more directly reflect the light but the woods won’t have clear direction. If you are interested, try adding this using Classic 3D Rendering 古典的 3D レンダリング as a reference.
スペキュラーを計算するには場所によって異なる値を求め、雪は光をより直接的に反射し、森には明確な向きを持たせないといった調整が必要です。興味があれば、 Classic 3D Rendering 古典的 3D レンダリング を参考に実装してみましょう。
Sky light
空からの光
This part calculates the reflection of the blue color of the sky. Again, I’m ignoring the specular component for simplicity. The more the surface faces toward the top, the more influence the sky has on it. See Sky light 空からの光 for more details.
この部分では空の青色の反射を計算します。ここでも簡略化のため、スペキュラー成分は無視しています。表面が上向きになるほど、空からの影響を強く受けます。詳しくはSky light 空からの光をご覧ください。
// Skylight
if (uSkyEnabled) {
  vec3 sky = skyColor * sqrt(clamp(0.5 + 0.5 * normal.y, 0.0, 1.0)) * 0.5;
  color += baseColor * sky;
}
Atmospheric Perspective
大気遠近法
This part simply fades the landscape into the sky based on the distance from the camera. This method using smoothstep is not physically accurate, but is pretty handy as it is very easy to control the range where the fading is applied.
この部分では、カメラからの距離に基づいて風景を空の色にフェードアウトします。smoothstepを使う方法は物理的に正確ではありませんが、フェードの適用範囲を簡単にコントロールできるため、とても便利です。
if (uAtmosphericPerspective) {
  float fade = smoothstep(4.0, 10.0, d);
  color = mix(color, skyColor, fade);
}
Final Demo
完成版デモ
This is the final version of the demo with the camera motion added so that it looks like a shot from a helicopter.
下は、ヘリコプターからの空撮のような効果を出すためにカメラの動きを加えた、最終バージョンのデモです。
The demo might be a little heavy as this method loops over the noise function many times per pixel. It works okay on my MacBook Pro but might slow down your machine depending on the specs.
このデモはそれぞれのピクセルに対してノイズ関数を何度も繰り返すので、少し処理が重くなる可能性があります。執筆に使っているMacBook Proでは問題なく動作しますが、マシンのスペックによっては処理が遅くなるかもしれません。
To explore more, you can try other functions to create the terrain. Think about different functions and how you could compute the derivatives and the distance to advance the ray. You could also try mixing this method with an SDF-based approach (hint: calculate the distance with both methods and select the one that is closer).
研究課題として、他の関数を使って地形を生成してみましょう。どのような関数を使えば微分値の値やレイを進める距離を求められるか考えてみましょう。また、この手法をSDFベースのアプローチと組み合わせることもできます(ヒント:両方の手法で距離を計算し、短い方を採用します)。