Designing 3D world 3Dのデザイン
Combining shapes
形を組み合わせる
To design complex shapes with SDF, you need to combine multiple different shapes. We have already seen how taking the minimum of two SDFs can merge shapes. In this section, we will explore other useful functions. These functions are all from Inigo Quilez’s article.
複雑な形状をSDFで作るには、複数の異なる形を組み合わせる必要があります。すでに2つのSDFの最小値を取ることで形状を結合する方法について触れました。このセクションでは、その他の便利な関数について説明します。これらの関数はすべて、Inigo Quilezの記事が出典です。
Boolean operations
ブール演算
Boolean operations are a common concept used in various design tools. With SDF, boolean operations such as union, intersection, and difference can be expressed as simple comparisons of distances, allowing you to sculpt various shapes.
ブール演算は、さまざまなデザインツールで使われています。SDFでは簡単な距離の比較を用いて、和(union)、共通部分(intersection)、差(subtraction)などのブール演算を表現することができます。これを使うとさまざまな形状を造ることができます。
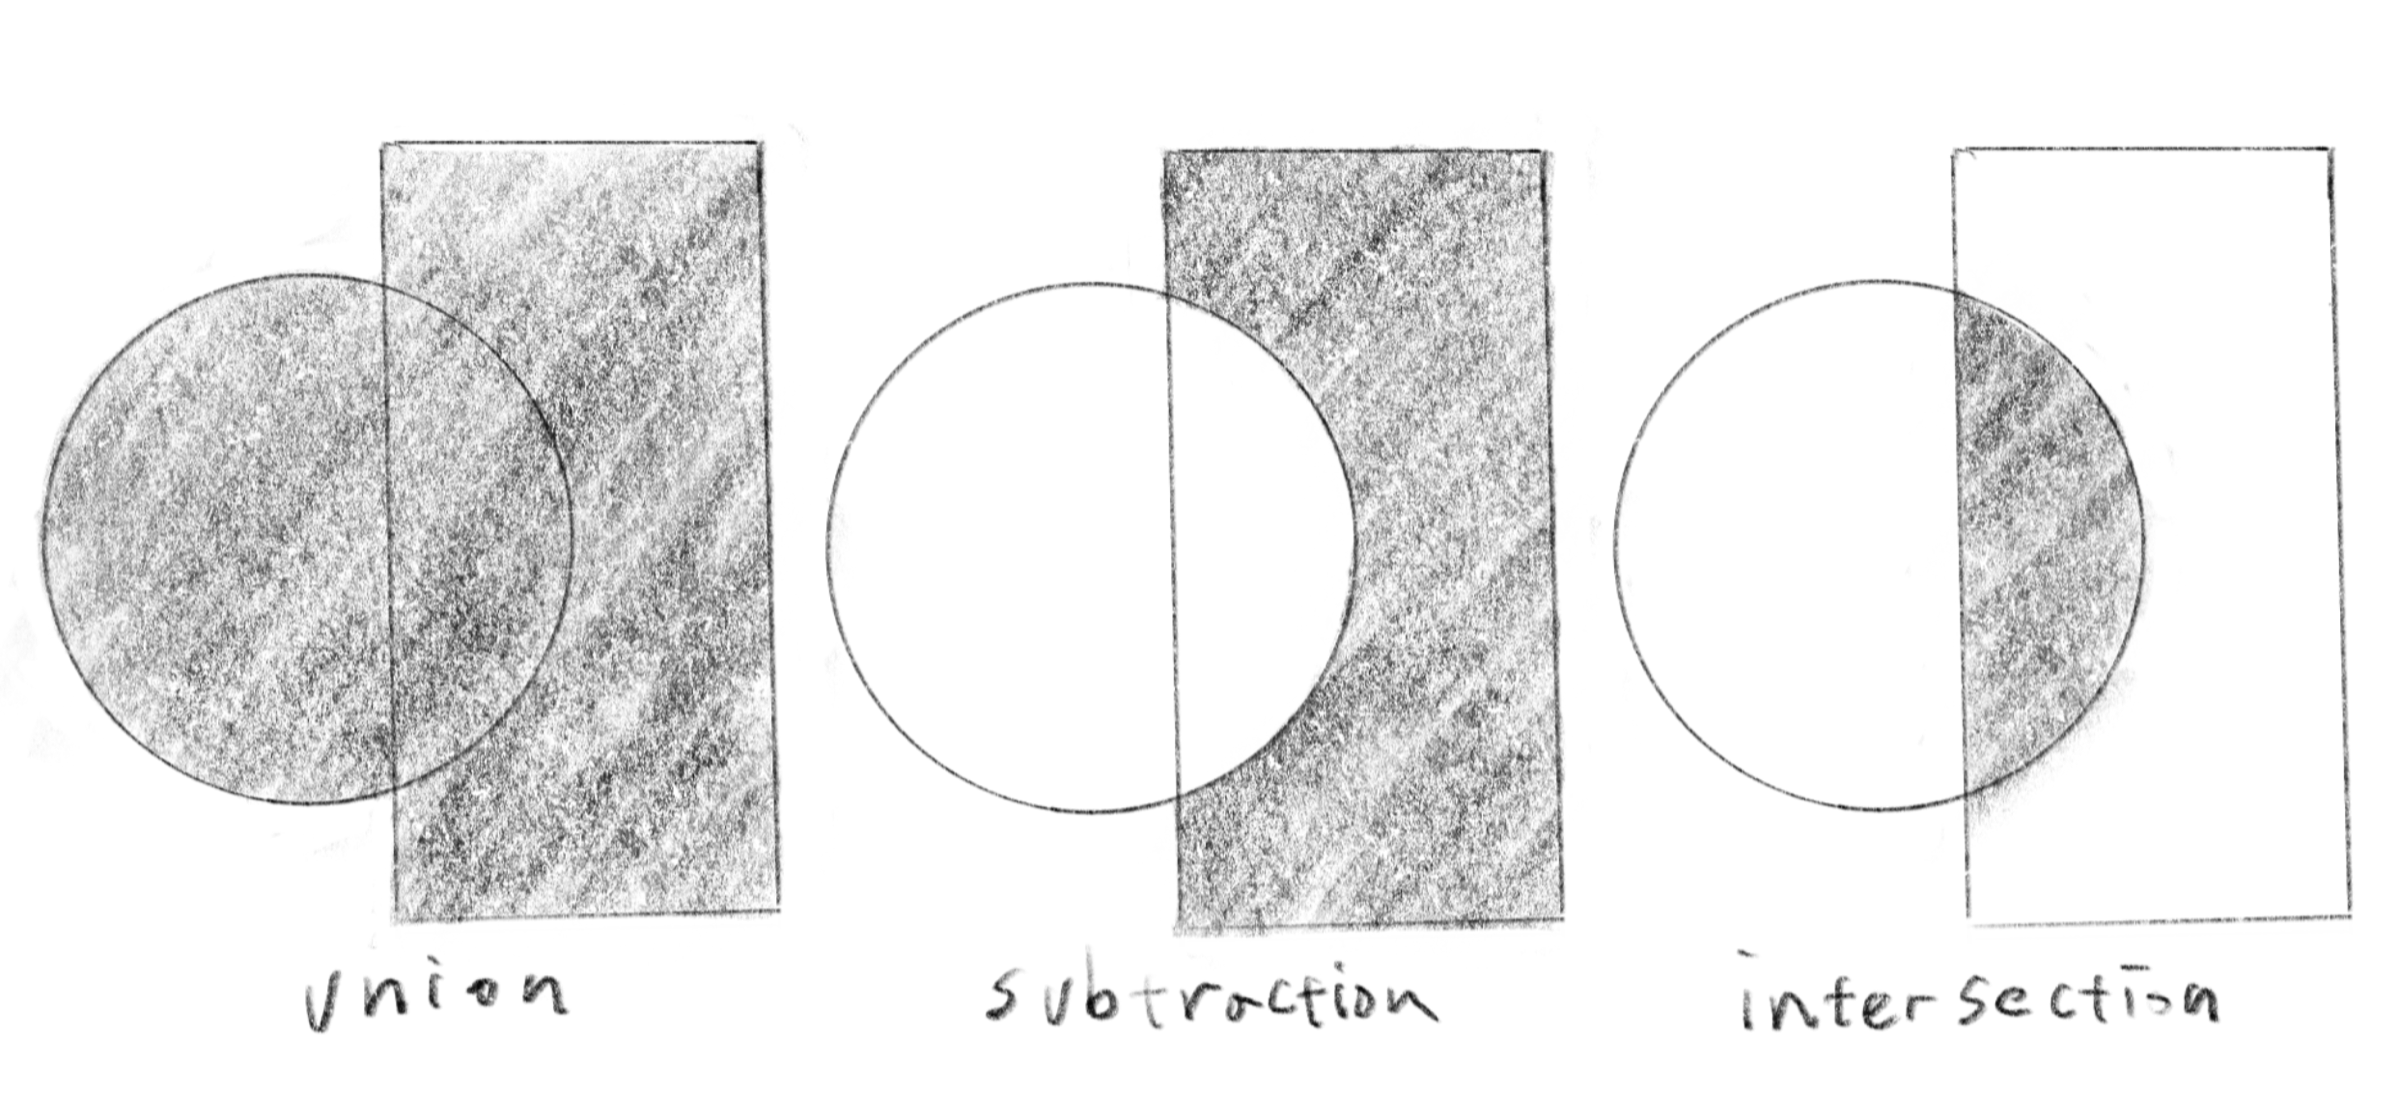
float opUnion( float d1, float d2 ) { return min(d1,d2); }
float opSubtraction( float d1, float d2 ) { return max(-d1,d2); }
float opIntersection( float d1, float d2 ) { return max(d1,d2); }
Smooth boolean operations
滑らかなブール演算
Below are the “smoothened” versions of the boolean operations that are very useful for organic shapes. These functions work similarly to the original boolean operations but can smooth out the creases where two objects meet.
以下は、有機的な形を作るのに非常に役立つブール演算の「滑らかな」バージョンです。これらの関数は、元のブール演算と同じように働きますが、2つの物体が接触する部分の折れ目を滑らかにします。
float opSmoothUnion( float d1, float d2, float k ) {
    float h = clamp( 0.5 + 0.5*(d2-d1)/k, 0.0, 1.0 );
    return mix( d2, d1, h ) - k*h*(1.0-h); }

float opSmoothSubtraction( float d1, float d2, float k ) {
    float h = clamp( 0.5 - 0.5*(d2+d1)/k, 0.0, 1.0 );
    return mix( d2, -d1, h ) + k*h*(1.0-h); }

float opSmoothIntersection( float d1, float d2, float k ) {
    float h = clamp( 0.5 - 0.5*(d2-d1)/k, 0.0, 1.0 );
    return mix( d2, d1, h ) + k*h*(1.0-h); }
To understand what these functions do, below is a graph of the opSmoothUnion function. It works exactly the same as the min function when the two input values are more than k units apart. However, within the range where (d2 - d1) is between -k and k, the shape becomes rounded.
これらの関数の働きを理解するために、下のopSmoothUnion関数のグラフを見て見ましょう。2つの入力値がk単位以上離れている場合、この関数はmin関数とまったく同じように機能しますが、(d2 - d1)が-kからkの間の場合、形が丸くなります。
Applying this to two SDFs results in a smooth connection between the two objects.
これを2つのSDFに適用すると、2つの物体が滑らかに繋がります。
The demo below showcases the three functions: opSmoothUnion, opSmoothSubtraction, and opSmoothIntersection, all together. It is important to note that the results of these three operations are connected using opUnion. This way, you can chain multiple operations to sculpt objects freely in the 3D world.
下のデモは、3つの関数opSmoothUnion、opSmoothSubtraction、opSmoothIntersectionが動作する様子をまとめて示しています。これらの3つの操作の結果はさらにopUnionを使用して合成されていることに注意してください。このように複数の操作を繋げて、3Dの世界で自由に彫刻することができます。
Repeating the space
空間を繰り返す
You can divide the space into multiple regions to repeat or mirror shapes. The code below divides the space into regions with a size of s. The variable rp represents the region that the point (the head of the ray) is currently in, while q represents the local coordinate within the region. The clamp statement is used to limit the number of regions.. You can either draw the same thing for all regions or use rp to change the shapes region by region.
空間を複数の領域に分けて、形を繰り返したり反転することができます。下のコードはサイズsの領域に空間を分割します。変数rpは現在の点(レイの先端)がどの領域にあるかを表し、qは領域内のローカル座標を表します。clampは分割する領域の数を制限する為にあります。全ての領域で同じように描画しても良いですし、rpを使って領域ごとに異なる形を描くこともできます。
float SDF(vec3 p) {
  vec3 s = vec3(0.25);
  vec3 rp = clamp(round(p / s), vec3(-1.0), vec3(1.0));
  vec3 q = p - s * rp;
  q = rotate(q, (rp.x + rp.y + rp.z) / 3.0 * PI / 4.0, vec3(0.0, 1.0, 1.0));
  return sdBox(q, vec3(0.05));
}
You might have noticed that the ray slows down when passing nearby the shapes. The more complex your design becomes, the more the rays will be affected by the various objects, which may result in visual artifacts. You might need to tweak different parameters, such as thresholds and the number of iterations for ray marching.
形状の近くを通過する際にレイの進みが遅くなることに気付いたでしょうか。構成が複雑になるほど、レイはさまざまな物体によって影響を受けるので、見た目の不具合が起きることがあります。レイマーチングの閾値や反復の回数など、様々なパラメータを調整する必要があるかもしれません。
Here is the rendering of the 3x3 grid of the boxes in 3D.
下は、3x3の直方体のグリッドを3Dでレンダリングしたものです。
Distorting the space
空間を曲げる
You can even distort the space to create various effects. The examples below create wavy shapes by adding a sine curve to the coordinates. While this technique is fun and adds nice details to objects, it should be used sparingly and with a small amount. Notice that the manipulation affects the entire SDF, which results in inaccurate representation of the distance to the surfaces and visual artifacts.
様々な効果を得るために、空間を歪めることもできます。下の例では、座標にサインカーブを足して波打つ形を作り出しています。このテクニックは物体にディテールを追加できて楽しいのですが、わずかな量で控えめに使いましょう。この操作はSDF全体に影響を与え、表面までの距離の表現が不正確になったり、見た目のバグを引き起こすので注意してください。
Learn more
もっと学ぶ
We have only scratched the surface of 3D rendering with SDF. This is a deep rabbit hole where you can spend an infinite amount of time experimenting and mastering it. It is also very handy for experimenting with various 3D rendering techniques and concepts, such as physically-based rendering. To learn more, Inigo Quilez’s website, which I have cited multiple times, is the best and one of the most comprehensive resources for learning SDF-based 3D techniques. Explore the site to discover a wide range of techniques and knowledge beyond what we have covered.
これはSDFを使った3Dレンダリングのほんのさわりです。これは奥深い分野で、いくらでも時間をかけて実験したり、技術を磨くことができます。また、物理ベースレンダリングなど、さまざまな3Dレンダリングの技術や概念の実験にも非常に便利です。SDFベースの3D技術についてさらに学ぶためには、ここまで何度も引用したInigo Quilezのウェブサイトが最も包括的な資料です。サイトを探索して、ここまででカバーした範囲を超えたさまざまな技術や知識を発見しましょう。