Mixing Colors 色を混ぜる
We briefly discussed how to manipulate colors in Computing Colors. On this page, we will look more into the different ways of what we do quite often in making pictures and graphics - mixing colors. With code, we can emulate, experiment, and explore how colors combine beyond the limitations of the traditional palette and brush.
「色を計算する」で色の操作方法について簡単に説明しました。このページでは、画像やグラフィックの作成でよく使う様々な混色方法について、より詳しく見ていきます。コードを使えば、伝統的なパレットや筆の制約を超えて、色がどのように組み合わさるかを模倣、実験、研究することができます。
At their core, colors on digital platforms are mere numbers. Although our eyes and brains perceive colors in a certain way, we can program various models and interpretations of these numbers. As a result, the output can range anywhere from realistic to surreal.
デジタルプラットフォーム上の色は、本質的には単なる数字です。目と脳は色をある特定の方法で認識しますが、コンピュータ上ではこの数字について様々なモデルを考えたり解釈をすることで、リアルなものから非現実的なものまで様々な結果を得ることができます。
Mixing RGB Colors
RGBの混色
Let’s start by mixing colors represented by RGB values. This is the most straightforward method because RGB aligns very well with how most of our screens display colors, as every pixel on these screens consists of tiny bits of red, green, and blue lights. Mixing colors in the RGB space is also a pretty good approximation of blending lights in the real world. You can read more about how our perception of light relates to the RGB color model in the Spectrum and Cones.
まず、RGB値で表された色を混ぜてみましょう。ほとんどのスクリーンは画素ごとに小さな赤、緑、青の光の点で構成されているので、RGBはスクリーン上での色の表示方法に直感的に対応しています。RGB空間での混色は、実世界での光を混ぜ合わせることのかなりよい近似でもあります。スペクトルと錐体のページで、光の知覚がRGBカラーモデルとどのように関係しているかについてもっと詳しく説明しています。
Note that, however, since most display devices are gamma-corrected, the RGB values are not directly proportional to the brightness of the pixel.
ただし、ほとんどのディスプレイデバイスはガンマ補正されているため、RGB値とピクセルの明るさは単純には比例しません。
You can mix two RGB colors by simply interpolating each of RGB channels.
RGBの色を混ぜるには、単に各RGBチャンネルを補間します。
// p5js already has the lerp function implemented, but just to be explicit.
function lerp(v0, v1, t) {
	return v0 * (1 - t) + v1 * t;
}

function rgbLerp(ca, cb, t) {
return {
    r: lerp(ca.r, cb.r, t),
    g: lerp(ca.g, cb.g, t),
    b: lerp(ca.b, cb.b, t)
  }
}
See the demo below to see this in action. You can randomize the colors by clicking on the canvas.
下のデモを見てみましょう。キャンバスをクリックすると色がランダムに変わります。
Linear interpolation ensures that the sum of the multipliers for each color remains consistent (equal to 1), but it doesn’t have to be. Imagine you have a green light and a red light, and you can control their intensities individually from 0% to 100%. You can mix them in any amounts. The demo below showcases this idea. Note that a screen has a maximum intensity for each color channel, and the RGB values will be clipped at 1. This is actually the same as the “Add” blend mode we’ll look at below.
線形補間は、それぞれの色の割合の合計を一定の値に(1に)保ちますが、必ずそうする必要はありません。緑色の光源と赤色の光源があって、それぞれの強度を0%から100%の間で制御できると考えてみてください。2つの色を任意の割合で混ぜることができます。下のデモはこの考え方を実装したものです。ただし画面には色チャンネルごとに出せる最大の明るさが決まっていて、RGB値は1で頭打ちになります。実は、これは後述する「加算」ブレンドモードと同じです。
Blending Modes
ブレンドモード
If you’ve worked with design or drawing tools, you may have encountered different “blending modes.” These modes let you mix colors from multiple layers or elements in various ways to create interesting looks. Essentially, blending modes involve taking values from two colors and calculating resulting values.
もしデザインや描画用のツールを使ったことがあれば、色々な「ブレンドモード」を見たことがあるでしょう。これらのモードを使うと、複数のレイヤーや要素の色を様々な方法で混ぜ合わせ、見た目に面白い効果を得ることができます。ブレンドモードは基本的に、2つの色の値を取り、結果の値を計算します。
Take a look at the demo below. You can select different blend modes from the dropdown menu and randomize the colors by clicking on the canvas. On both the left and right are the original colors before blending, and in the middle is the mixed color.
下のデモを見てください。ドロップメニューからはブレンドモードを選べます。キャンバスをクリックして色をランダムに変更することもできます。左右にあるのが混色前の元の色で、中央が色を混ぜたものです。
Here is the explanation of the blending mode in the demo. Once you understand the concept, you can study more examples or even create your own functions. For all the examples, we assume that each R, G, and B value is within the range of zero to one.
以下はデモで用いたブレンドモードの説明です。概要が掴めたら、他の例を見ても良いですし、独自の関数を作って見るのも良いでしょう。すべての例で、R、G、Bそれぞれの値が0から1の範囲内にあるとします。
Multiply
乗算
The Multiply blending mode multiplies the channel values of the two colors. The result is often a darker color. Multiplying with white leaves the color unchanged, while multiplying with black results in black.
乗算ブレンドモードは、2つの色のチャンネルの値を掛け合わせます。結果は通常、より暗い色になります。白との乗算では色は変わらず、黒との乗算では黒になります。
function multiply(color0, color1, t) {
    const mixed = {
        r: color0.r * color1.r,
        g: color0.g * color1.g,
        b: color0.b * color1.b
    };
    return lerp(color0, mixed, t);
}
Add
加算
The Add blending mode sums up the channel values of the two colors, resulting in a brighter color. Adding black leaves the color unchanged, while adding white makes it white. This is sometimes called Linear Dodge, which comes from the term “dodging” in photography. Dodging involves decreasing exposure of a certain spot during development to brighten the area. The opposite of dodging is burning, which means to increase exposure to darken a photo.
加算ブレンドモードは、2つの色のチャンネルを合計して、より明るい色を作り出します。黒を加えると色は変わらず、白を加えると白になります。これは写真撮影の際の「ドッジ」という用語に由来し、線形ドッジと呼ばれることもあります。ドッジは、現像中に特定の箇所の露光を減らしてそのエリアを明るくすることを指します。ドッジの反対はバーン(焼き込み)で、写真を暗くするために露光を増やすことです。
function add(color0, color1, t) {
    const mixed = {
        r: Math.min(1, color0.r + color1.r),
        g: Math.min(1, color0.g + color1.g),
        b: Math.min(1, color0.b + color1.b)
    };
    return lerp(color0, mixed, t);
}
Screen
スクリーン
The Screen blending mode may look a little confusing in code, but it is essentially the opposite of Multiply. It first inverts both colors, multiplies them, and then inverts the result again, typically resulting in a brighter color. Screening with white results in white, while screening with black leaves the color unchanged.
コードは少しわかりにくいかもしれませんが、スクリーンブレンドモードは実質乗算の逆です。両方の色を反転させ、それを乗算し、結果を再び反転させることで、通常はより明るい色になります。白でスクリーン合成すると白になり、黒でスクリーン合成すると色は変わりません。
function screen(color0, color1, t) {
    const mixed = {
        r: 1 - (1 - color0.r) * (1 - color1.r),
        g: 1 - (1 - color0.g) * (1 - color1.g),
        b: 1 - (1 - color0.b) * (1 - color1.b)
    };
    return lerp(color0, mixed, t);
}
Overlay
オーバーレイ
Overlay combines Multiply and Screen blending modes. If the lower color (color0) is less than 0.5, the multiply mode is used, otherwise, the screen mode is applied. It makes the brighter channels even brighter and the darker channels darker, which adds contrast to an image as a result.
オーバーレイは乗算とスクリーンのブレンドモードを組み合わせたものです。重ね順で下になる色が0.5よりも小さい場合は、乗算モードが、それ以外の場合はスクリーンモードが適用されます。これにより明るいチャネルはさらに明るく、暗いチャネルはさらに暗くなり、結果として画像のコントラストが増します。
function overlay(color0, color1, t) {
    const mixed = {
        r: (color0.r < 0.5) ? (2 * color0.r * color1.r) : (1 - 2 * (1 - color0.r) * (1 - color1.r)),
        g: (color0.g < 0.5) ? (2 * color0.g * color1.g) : (1 - 2 * (1 - color0.g) * (1 - color1.g)),
        b: (color0.b < 0.5) ? (2 * color0.b * color1.b) : (1 - 2 * (1 - color0.b) * (1 - color1.b))
    };
    return lerp(color0, mixed, t);
}
Using Different Color Models
様々なカラーモデルを使う
As discussed in Computing Colors, there are various color models that can be used for different results. Now that we have explored other ways of calculating the mix of two colors, think about if there are other methods, apart from linear interpolation, to mix colors in those models. While some methods may not make much sense depending on the model (e.g., what does it mean to add two hues in the HSB or Lch model? ), you may come up with other interesting ideas, such as taking the maximum of saturations. There is no right or wrong approach. Try out different ideas and you might find something that surprises you.
「色を計算する」で見たように、様々なカラーモデルを用いると異なる結果が得られます。2つの色を混ぜる様々な計算方法を学んだので、線形補間以外を使って混色できるか考えてみましょう。一部の方法はモデルによってはあまり意味をなさないかもしれません(例えば、HSBやLchモデルで2つの色相を加算するとはどういう意味になるでしょう。)、が彩度の最大値を取るなど、面白いアイデアを思いつくかもしれません。アプローチに正解や不正解はありません。様々なアイデアを試してみれば、驚くような結果が得られるかもしれません。
Kubelka-Munk
クベルカ・ムンク
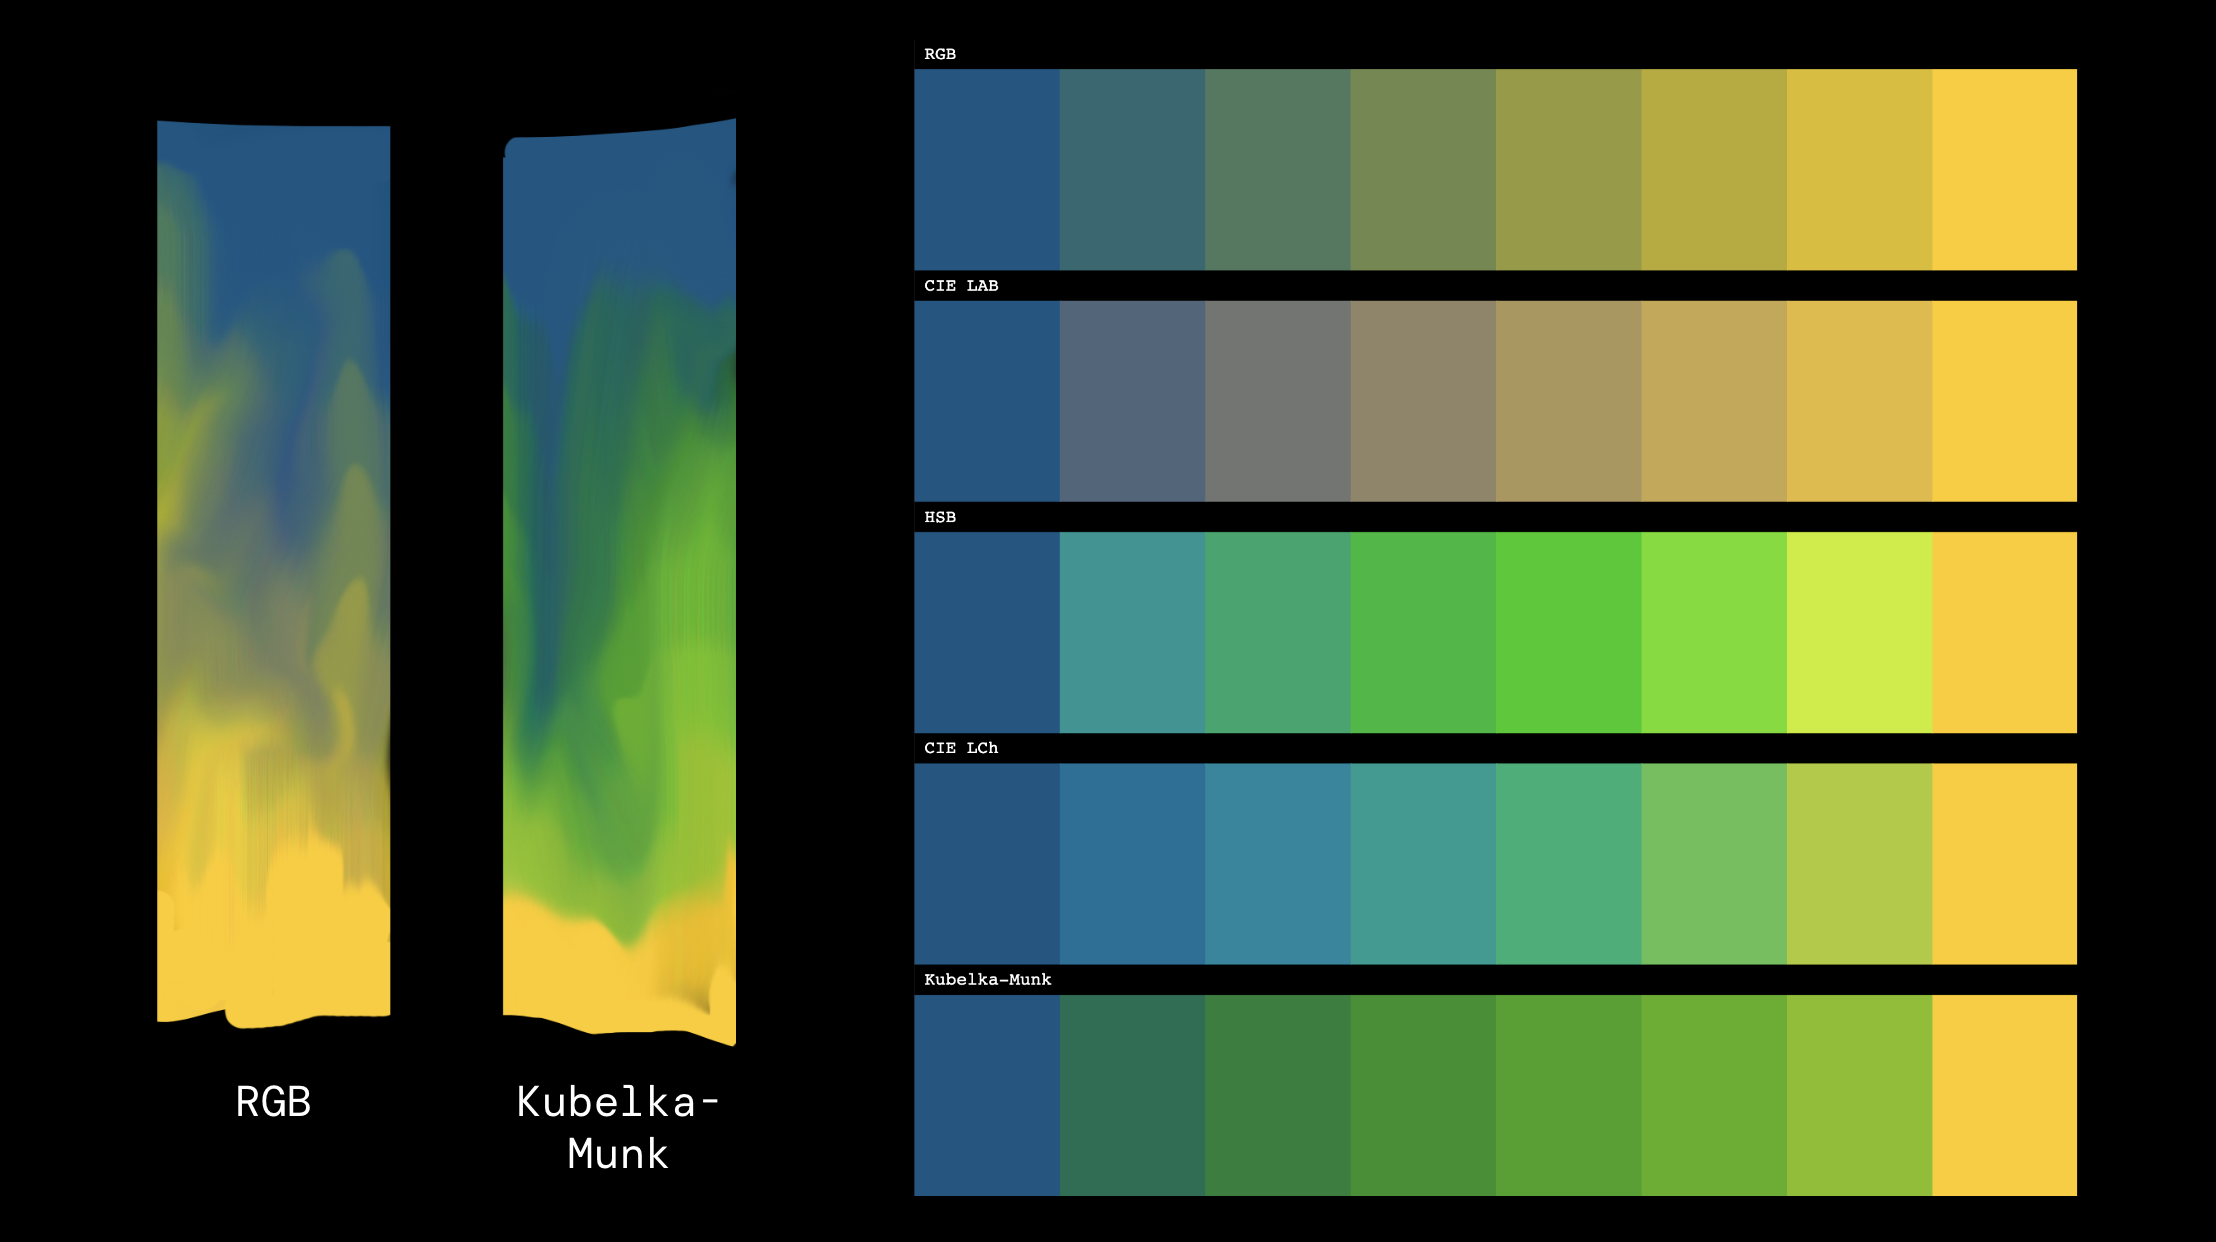
If you’re looking for something more physically accurate, you might be interested in Kubelka-Munk theory and other related theories. This theory is used to simulate the properties of each pigment in a mixture to predict colors that are closer to those of actual paints. For example, while mixing blue and yellow using RGB results in a dull, grayish color, the Kubelka-Munk method can yield a much brighter green. This is closer to what you’d see when mixing real paints (or, because you can create paints with different properties, your paints may behave differently).
より物理的に正確なものを探している場合は、クベルカ・ムンクやその関連の理論が面白いかもしれません。この理論は、混合物中の顔料の特性をシミュレートして、実際の絵の具に近い色を予測するために使われます。例えば、RGBを使って青と黄を混ぜるとくすんだ灰色っぽい色になりますが、クベルカ・ムンクの手法では、実際の絵の具を混ぜた時のように、はるかに明るい緑が得られます(または違った振る舞いを見せる、異なる特性を持つ絵の具を作ることもできます)。
I have to admit that I don’t fully grasp this topic. I found that it is quite a rabbit hole as I went through several documents. Rather than delving into the details, I will provide a high-level overview and a simple example implementation that I have pieced together from the materials I have reviewed. Any suggestions for improvement or corrections are greatly appreciated.
正直、この理論を完全に理解しているわけではありません。ドキュメントをいくつか読んでみましたが、かなり入り組んでいることがわかりました。ここでは細かな内容には踏み込まず、参考にした資料を元にまとめた概要と簡単な実装例を示します。改善や修正などご意見があればお願いします。
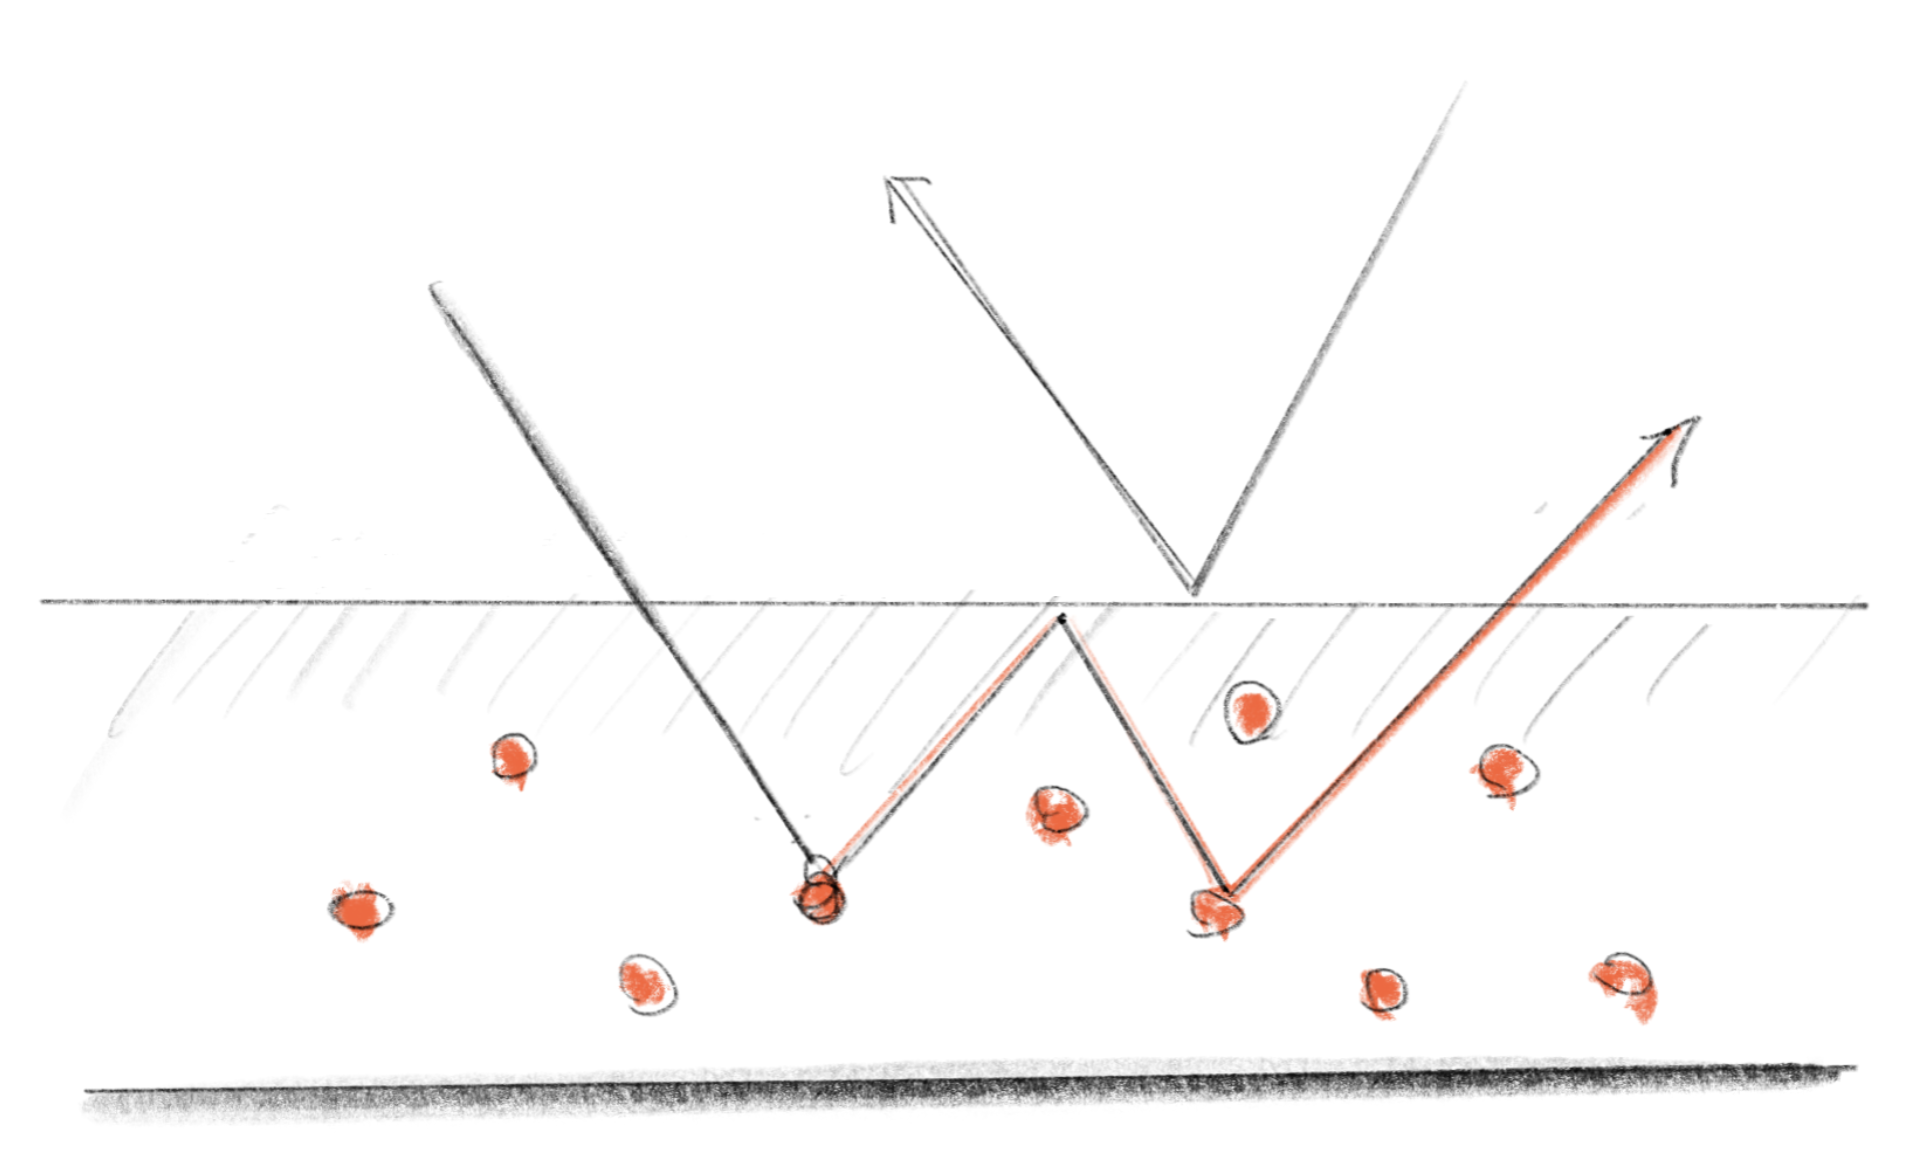
The most fundamental concept is that when light enters a layer of paint, composed of pigments and a medium, it bounces around within the layer until it exits. During this process, the pigment absorbs some of the light and scatters the remainder. The absorption and scattering are represented by coefficients and , respectively.
光は顔料と媒体から成る絵の具の層に入ると、外に出るまでの間、層の内側で跳ね返りながら進んで行くというのが最も基本的なコンセプトです。このプロセスの間、顔料は光の一部を吸収し、残りをあらゆる方向に反射(散乱)します。吸収と散乱はそれぞれ係数とで表されます。
and are defined across the entire spectrum of visible light. If you pick a specific frequency, you can calculate how much of the original light will be reflected.
とは可視光のスペクトル全体に対して定義されます。特定の周波数を選ぶと、元の光がどれくらい反射されるかを計算できます。
There are various formulas to calculate this practically, but we will use the following formula:
これを実用的に計算する式は色々あるのですが、ここでは以下の式を使用します:
and apply an adjustment called Saunderson correction, which takes into account the reflection on the surface of the medium.
そして、サンダーソン補正という媒体の表面での反射を考慮した補正を適用します。
, are reflectance constant determined by the characteristic of the material. I used 0.01 and 0.6 in the demo below.
、は材料の特性によって決まる反射率定数です。下のデモでは、0.01と0.6を使いました。
Looking at these formulas may not make intuitive sense (they didn’t for me), and when math equations don’t make much sense, it’s time to visualize them! Run the demo to see the chart that shows how , , and are related. A few takeaways are:
これらの式を見てもピンとこないかもしれませんが(自分はよく分かりませんでした)、数式の意味がよくわからない時は視覚化です。デモを実行して、、、の関係を示す表を見てください。いくつか気づくことがあります。
-
R is totally dependent on the ratio between and (
k/s) -
The smaller
k/s(or the larger the inverse s/k), the larger R becomes, but the relationship is not quite linear. -
Rはと (
k/s)の比率に完全に依存しています。 -
k/sが小さいほど(またはその逆のs/kが大きくなるほど)、Rも大きくなりますが、その関係は完全に線形ではありません。
Roughly speaking, the darker the color, the higher the absorption (), and the brighter the color, the higher the scattering (), which seems to match our common sense.
大まかに見れば吸収()が大きいほど暗く、散乱()が大きいほど明るくなるので、納得感があります。
Let’s see color mixing in action. The demo has eight pre-defined pigments, and mixes a couple of them at a time. You can click on the canvas to shuffle the colors.
実際に色を混ぜてみましょう。デモでは予め定義された8つの顔料を2つずつ混ぜます。キャンバスをクリックすると色をシャッフルできます。
To keep it simple, this demo defines pigments directly in terms of RGB, instead of the entire spectrum of visible light.
シンプルにするため、このデモでは可視光のスペクトル全体ではなく、RGBの値に対して顔料を定義しています。
// k:[K_r, K_g, K_b], s:[S_r, S_g, S_b]
const pigments = [
    {name: "Burgundy", k:[0.25, 1.45, 0.55], s:[0.55, 0.05, 0.55]},
    {name:"Blue1", k:[0.85, 0.85, 0.05], s:[0.05, 0.05, 0.2]},
		...
];
The kmLerp function mixes two pigments, or two sets of and , using linear interpolation. Then, the convertPigmentsToRGB function converts the mixed and into an RGB color using the formulas above.
kmLerp 関数は、線形補間を使って2つの顔料または2組のとのセットを混ぜます。次に、 convertPigmentsToRGB 関数で、上記の式を使用して混合されたとをRGBに変換します。
The adj function is somewhat arbitrary, but it is used to map the output to cover the range of 0.0 to 1.0 in the RGB space.
adj関数はやや恣意的ですが、出力をRGB空間で0.0から1.0の範囲にマッピングするために使用されます。
As you can see, this is a very rough approximation, but I hope you get the basic idea. To learn more, here is a list of the materials I used to write this section.
見てわかるように、これはかなり大ざっぱな近似ですが、基本的なアイデアが伝わればと思います。詳しく知りたい方には、こちらがこのセクションを書くために使用した資料のリストです。
If you’re looking for a robust and convenient solution, MixBox is by far the best option that I know of. A major drawback of Kubelka-Munk is that it requires defining pigments, which makes it difficult to work with arbitrary colors. Furthermore, because most major graphic pipelines are optimized for dealing with only 3 channels (plus alpha), using Kubelka-Munk can significantly complicate data handling. MixBox addresses this challenge by converting any RGB colors into a mix of pre-defined pigments behind the scenes. This enables you to mix colors with simple code (e.g., in GLSL: vec3 rgb = mixbox_lerp(rgb1, rgb2, t)) and get more physically accurate results. Note that MixBox requires a license for commercial use. See their website for further details. Also, their paper is an amazing demonstration of how they translated a complex theory into a simple and practical API. I highly recommend reading it.
もし堅牢で便利な方法が欲しい場合は、MixBoxが知っている中では最も良い選択肢です。クベルカ・ムンクの大きな欠点は、色素を定義する必要があるので自由に色を使うのが難しいことです。また、主要なグラフィックパイプラインのほとんどは、3つのチャネル(と透明度)のみを扱うように最適化されているため、クベルカ・ムンクを使用するとデータ処理が複雑になりがちです。MixBoxは舞台裏でRGBを事前に定義された色素の混合に変換することで、この課題に対処します。これにより、簡単なコード(例:GLSLで vec3 rgb = mixbox_lerp(rgb1, rgb2, t))で色を混ぜて、より物理的に正確な結果を得ることができます。なお、商業利用にはMixBoxのライセンスが必要です。詳細については、MixBoxのウェブサイトをご覧ください。また、同サイトにある論文では、どのように複雑な理論をシンプルで実用的なAPIに変換したかが見事に説明されています。ぜひ読んでみることをおすすめします。


open-km is another, more straightforward implementation of Kubelka-Munk in GLSL. This is somewhat similar to my simple demo, but is much more elaborate and defines the pigments as spectral data, not directly in RGB.
open-kmは、GLSLでクベルカ・ムンクをより直接的に実装したものです。これはこのページのシンプルなデモにやや似ていますが、より精緻で、かつ顔料を直接RGBに対してはなくスペクトルデータとして定義しています。
https://github.com/lwander/open-km