Kinematics キネマティクス
The term “kinematics” comes from the Greek word “kinesis,” which means motion, and it mainly focuses on the motion itself rather than the forces or causes behind it. This is in contrast to “dynamics,” which emphasizes the role of forces (“dynamics” is derived from the Greek word “dynamis,” meaning power).
キネマティクス(運動学 kinematics)という言葉は、ギリシャ語で動きを意味する「kinesis」から来ています。キネマティクスは力やその背後にある原因ではなく、主に動き自体に焦点を当てます。これは力の役割に重きをおくダイナミクス(動力学 dynamics)と異なる点です(ダイナミクスはギリシャ語で力を表す、「dynamis」から派生しています)。
Forward kinematics and inverse kinematics are common techniques used in robotics, games, and so on to describe the motion of jointed parts, such as mechanical arms or human bodies. They are powerful tools when you want to animate a character or an object made with many pieces joined together, like an artist’s manikin.
フォワードキネマティクスとインバースキネマティクスは、ロボット工学やゲームなどで、機械の腕や人間の体のような関節部分の動きを表現するためによく使われる技術です。デッサン用の人形のように、多くの部品が連結されて作られたキャラクターや物体のアニメーションを作る際の強力なツールです。
Forward Kinematics (FK)
フォワードキネマティクス(FK)
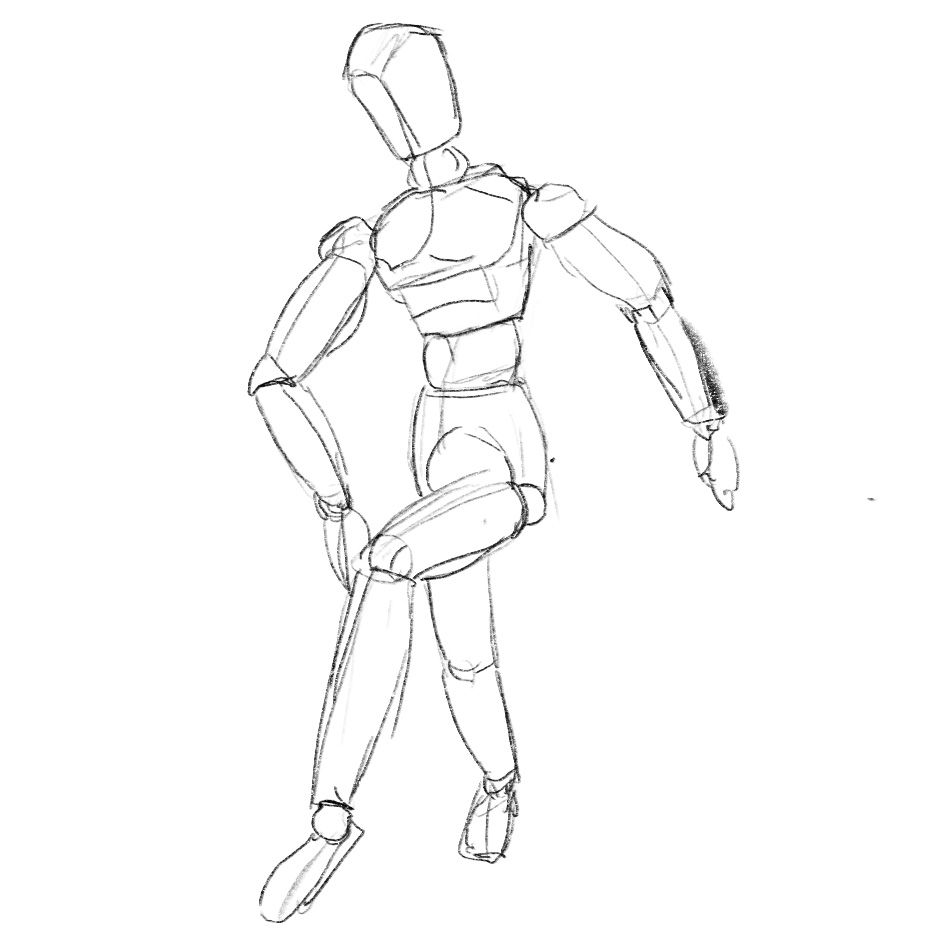
Take a look at this picture of a robot arm. Forward kinematics (FK) controls the posture of this arm by setting the angles for each joint. It starts from the bottom or the root and sets the pose for each joint, sequentially advancing ‘forward’ towards the end.
このロボットアームの絵を見てください。フォワードキネマティクス(FK)は各関節の角度を設定してこのアームの姿勢を制御します。土台や根元から始めて、関節ごとに順に進む(advance forward)ことでポーズを決めます。
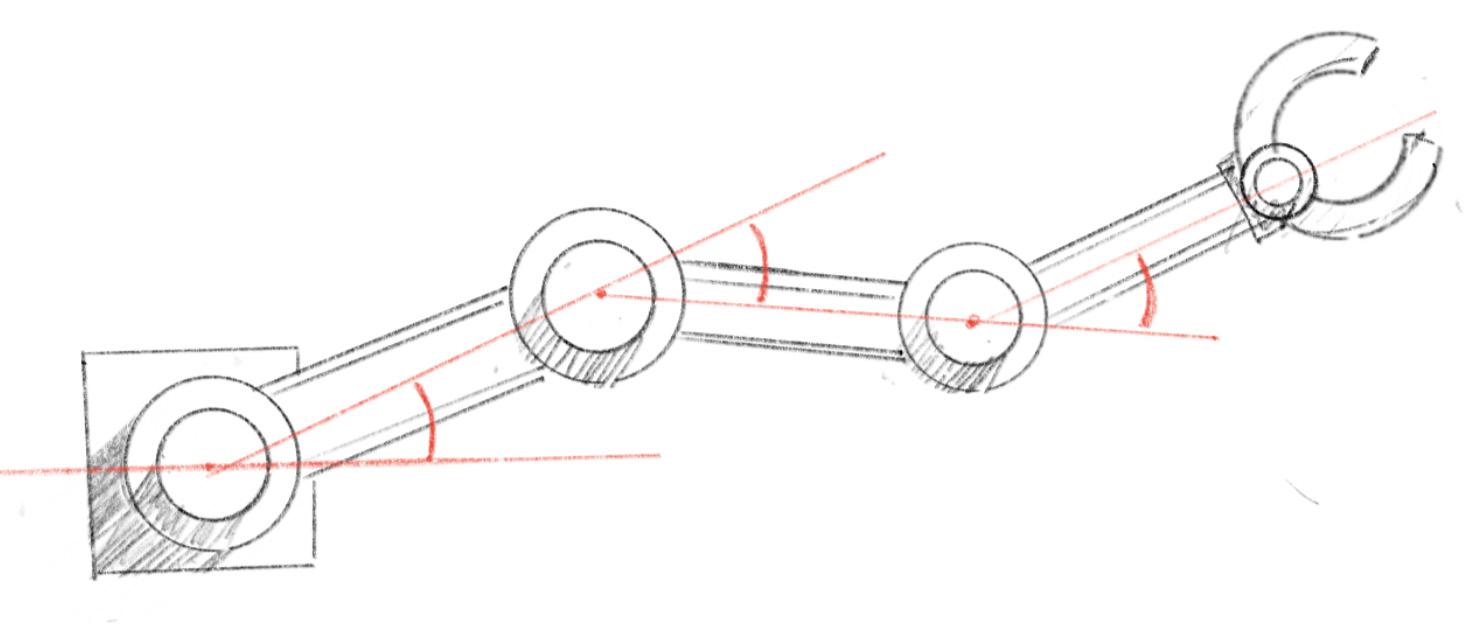
Let’s see a simple model in action. This arm is defined by two sets of values: the lengths of each segment and the angle of each segment relative to its base (the segment right before it). The numbers below each joint represent its angle.
シンプルなモデルを動かしてみましょう。このアームは2種類の値、各部分(セグメント)の長さと、それぞれのセグメントのその土台(ひとつ手前のセグメント)に対する角度で定義されます。各関節の下の数字はその角度を表しています。
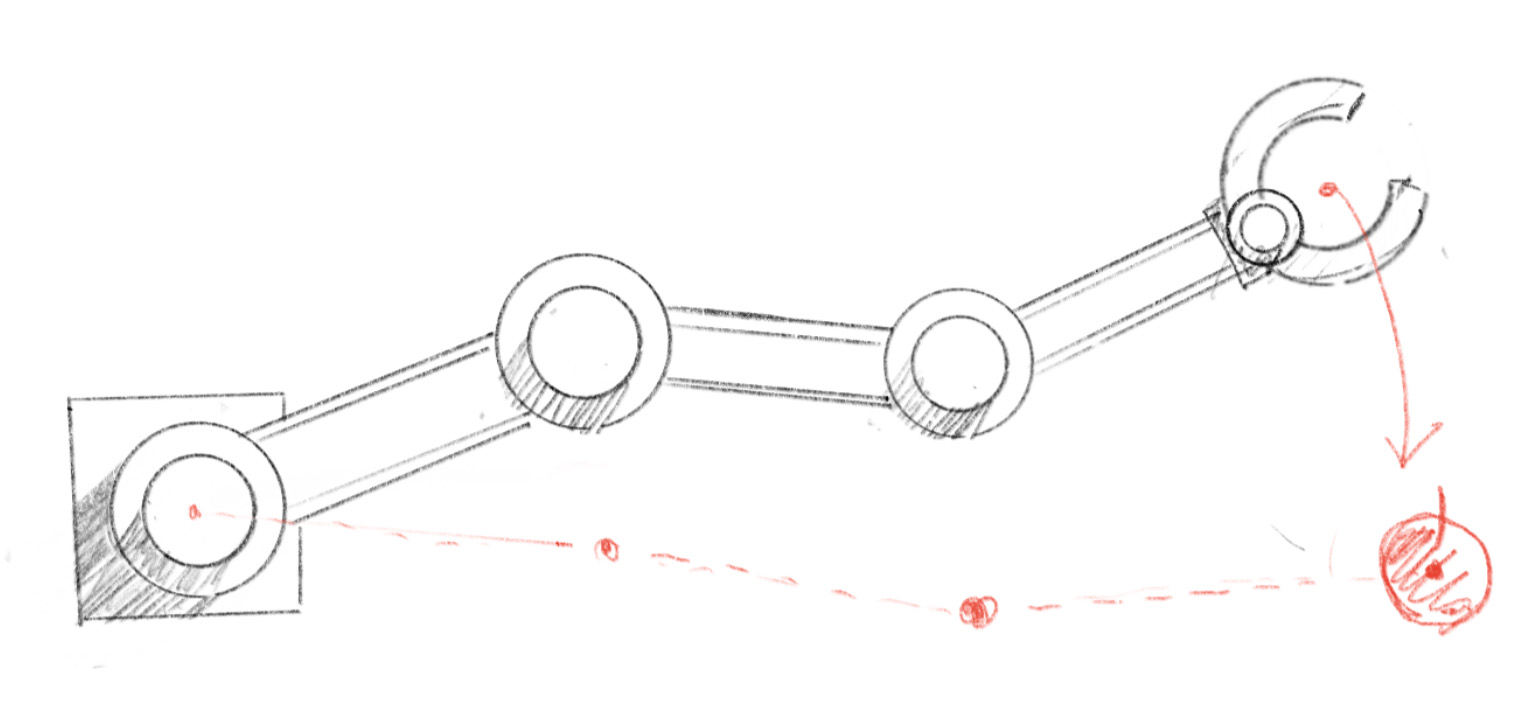
You can add any number of segments to forward kinematics. The demo below showcases a series of arms with four segments and joints, each repeating the exact same motion with a slight time offset. It’s fascinating that this already starts to resemble a life form, plant, or sea creature. Forward kinematics is a powerful tool in animation, useful for everything from simple character motion to larger scales like landscapes or bizarre monsters.
フォワードキネマティクスには幾つでもセグメントを追加できます。下のデモでは、4つのセグメントと関節を持ついくつものアームが、わずかにタイミングをずらして同じ動きを繰り返す様子が見られますが、これだけですでに生命体、植物または海洋生物を思わせる動きが生まれています。フォワードキネマティクスはアニメーションのための強力なツールで、シンプルなキャラクターの動きから大規模な風景や奇妙なモンスターまで、あらゆるものに役立ちます。
Inverse Kinematics (IK)
インバースキネマティクス(IK)
As the name suggests, inverse kinematics (IK) is essentially the opposite of forward kinematics. It also deals with a system of segments connected by joints, but instead of setting the angles for each joint individually, the goal is to find the angles for all joints given a target, often referred to as an “effector”. This is very useful because often when creating animations, we have a specific target (“I want her to grab this book”, “He should step on this spot then jump”), but figuring out all the joint angles to make the correct posture can be very tedious. We would rather let the computer do the job.
名前が示す通り(inverse は逆という意味です)、インバースキネマティクス(IK)は基本的にフォワードキネマティクスの反対です。やはり関節で繋がった一連のセグメントを扱いますが、各関節の角度を個別に設定するのではなく、ある目標(「エフェクター」と呼ばれます)を元に、すべての関節の角度を計算することを目指します。アニメーションを作る時にはたいてい何か特定の目標(「この本をつかませたい」、「この場所に踏み込んでからジャンプしてほしい」)がありますが、すべての関節の角度を考えて正しい姿勢を作るのは非常に面倒なので、インバースキネマティクスはとても便利です。面倒な仕事はコンピュータに任せましょう。
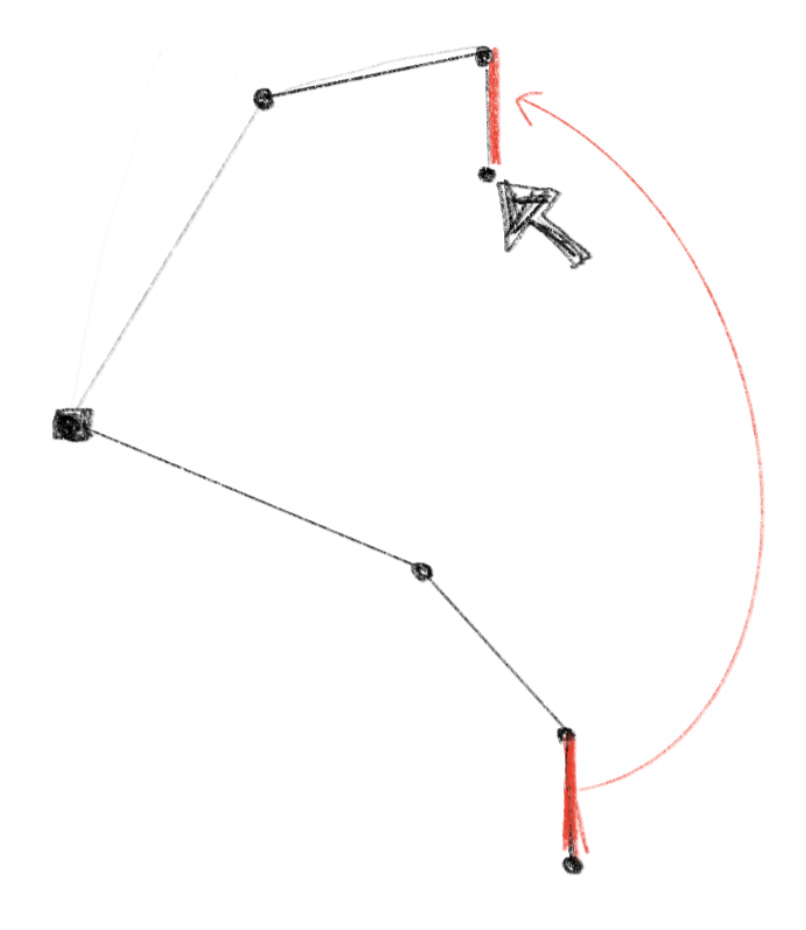
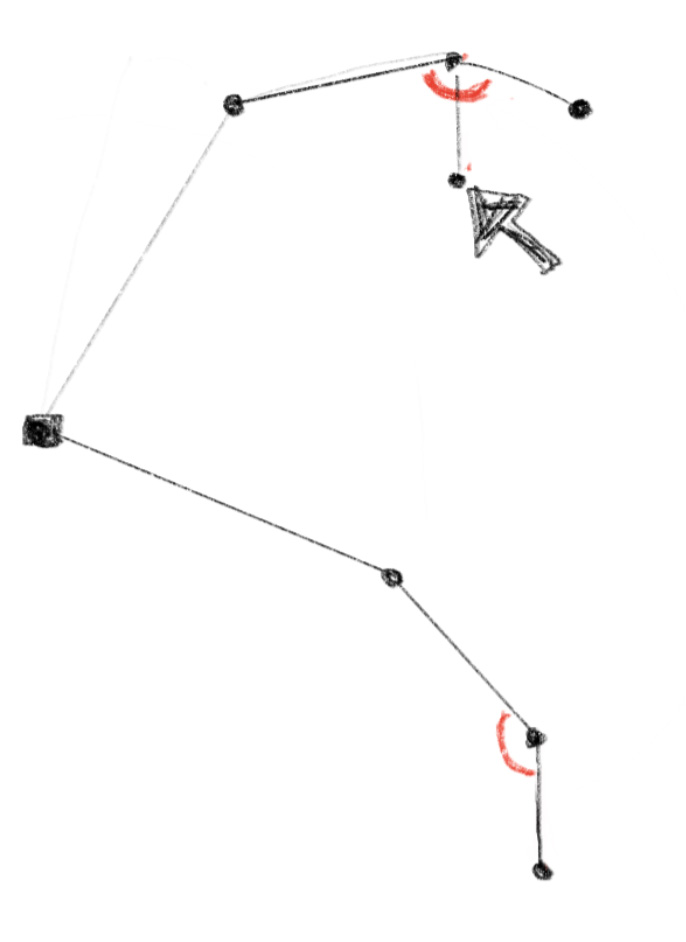
In general, inverse kinematics is much more challenging than forward kinematics. As illustrated in the diagram below, there can be numerous postures to reach the same target. The optimal solution and method can vary depending on various conditions, such as the previous posture or different priorities. For instance, you might want to minimize movement or the amount of computation.
大抵の場合、インバースキネマティクスはフォワードキネマティクスよりもずっと難しくなります。下の図で示したように、同じ目標に到達するための姿勢には無数の解があり得ます。最適な答えや手法は、前の姿勢や異なる優先順位など、さまざまな条件に左右されます。例えば、動きを最小限に抑えたり、計算量を最小限に抑えるといった具合です。
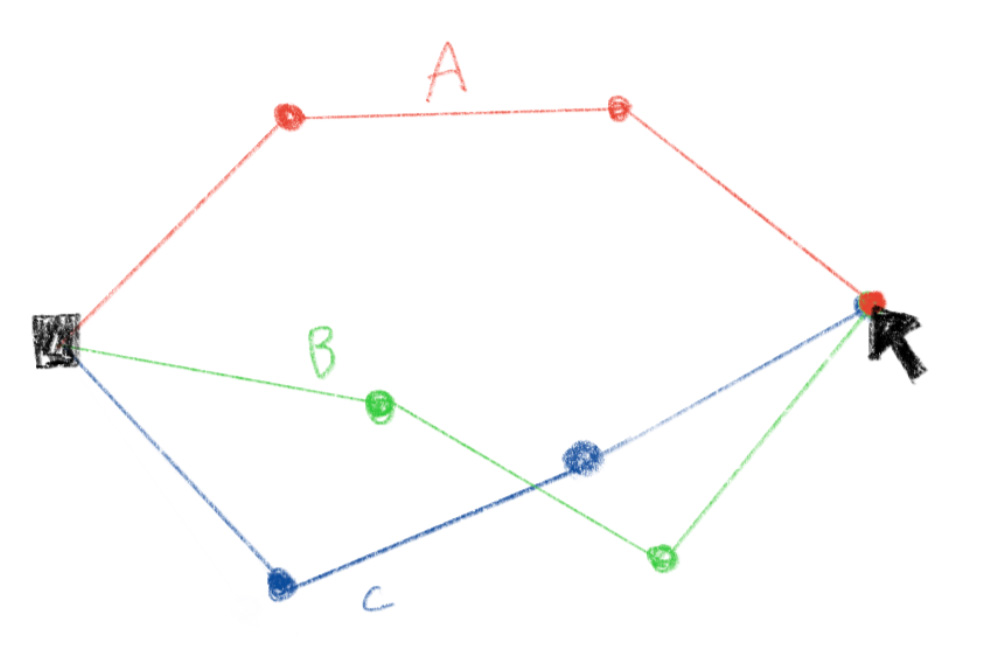
There are an infinite number of valid answers
Inverse kinematics with two segments
2つのセグメントのインバースキネマティクス
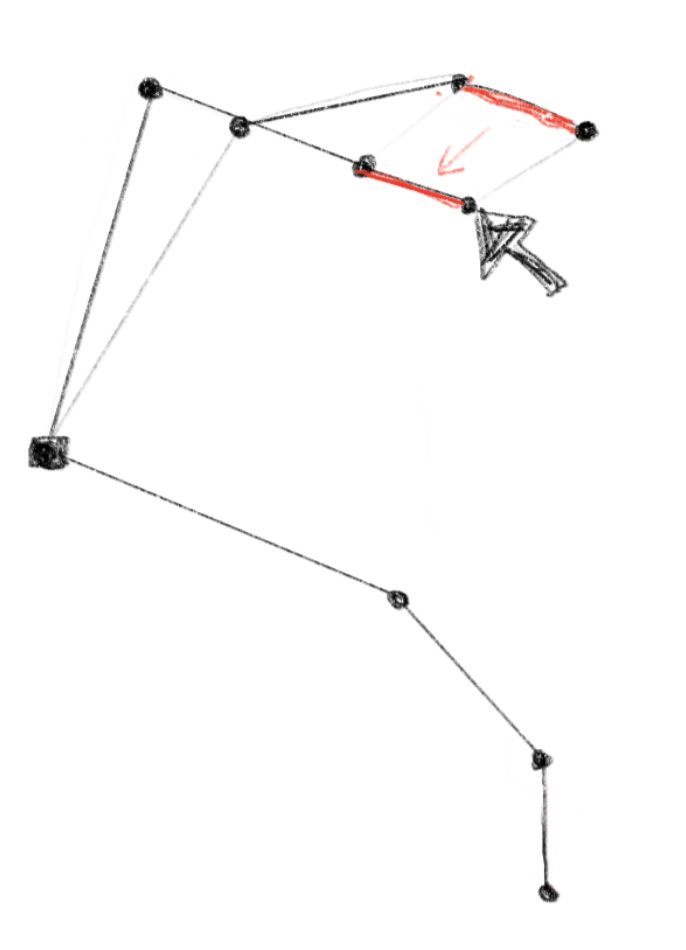
When there are only two segments, it’s relatively simple because there are just two possible postures to reach a target. The arm forms congruent triangle shapes for these postures.
セグメントが2つだけの場合、ターゲットに到達するために可能な姿勢は2つしかないので、比較的シンプルです。この2つの姿勢でアームが作る形は合同な三角形になります。
In the demo below, the arm tries to reach to the mouse pointer so that the tip of the last segment touches it.
下のデモではアームが、最後のセグメントの先端がマウスポインタに到達するように腕を伸ばします。
The calculateIK function is the core of the demo.
デモの中心となるのは calculateIK 関数です。
Since we know the length of all three sides of the triangle that the arm makes, we can use law of cosines to find the angle for the lower arm(the second segment).
腕が作る三角形のすべての辺の長さがわかっているので、下腕(2つ目のセグメント)の角度を計算するために余弦定理が使えます。
const cosC = (lengthA * lengthA + lengthB * lengthB - (dx * dx + dy * dy))
							/ (2 * lengthA * lengthB);
const angle2 = PI - acos(constrain(cosC, -1, 1));
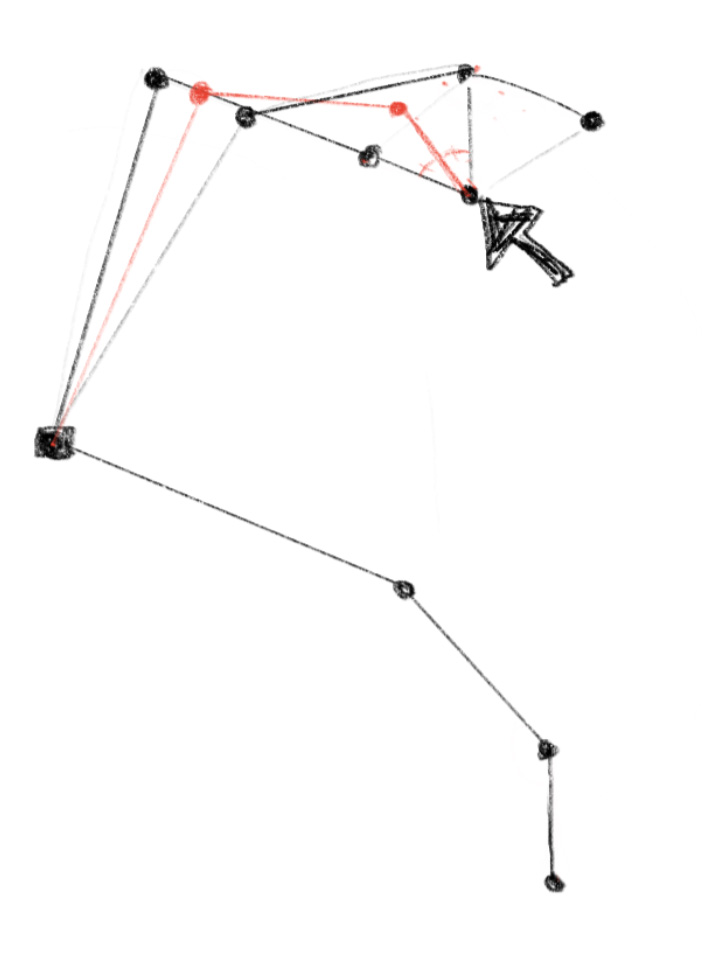
The law of cosines relates the lengths of the sides of a triangle to the cosine of one of its angles. Compare the formulas and drawing below to the code above. dx * dx + dy * dy is the square of the distance between the base of the arm to the other end. This corresponds to the in the formula.
余弦定理は、三角形の各辺の長さと1つの角のコサインとの関係を示します。上記のコードと下記の式や絵を比べてください。dx * dx + dy * dyは、腕の根本から逆の端までの距離の2乗で、公式の に対応します。
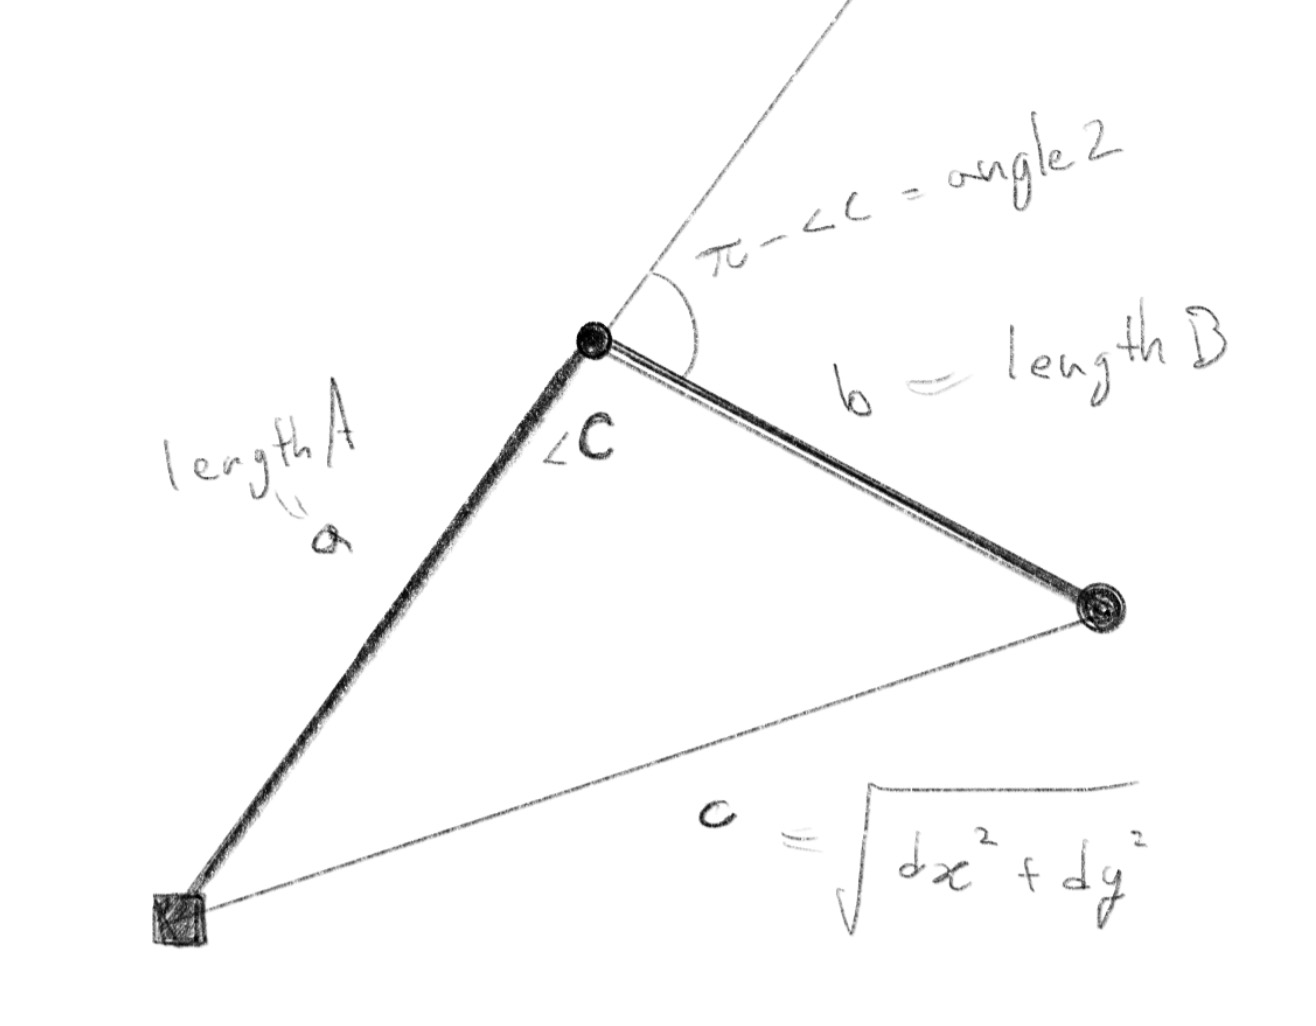
Note that what we want is the rotation of the segment from the straight position, which is the outer angle of in radians, which is .
知りたいのは直線位置からのセグメントの回転なので、 の外角をラジアンで示したもの、つまりが求める角度になることに注意してください。
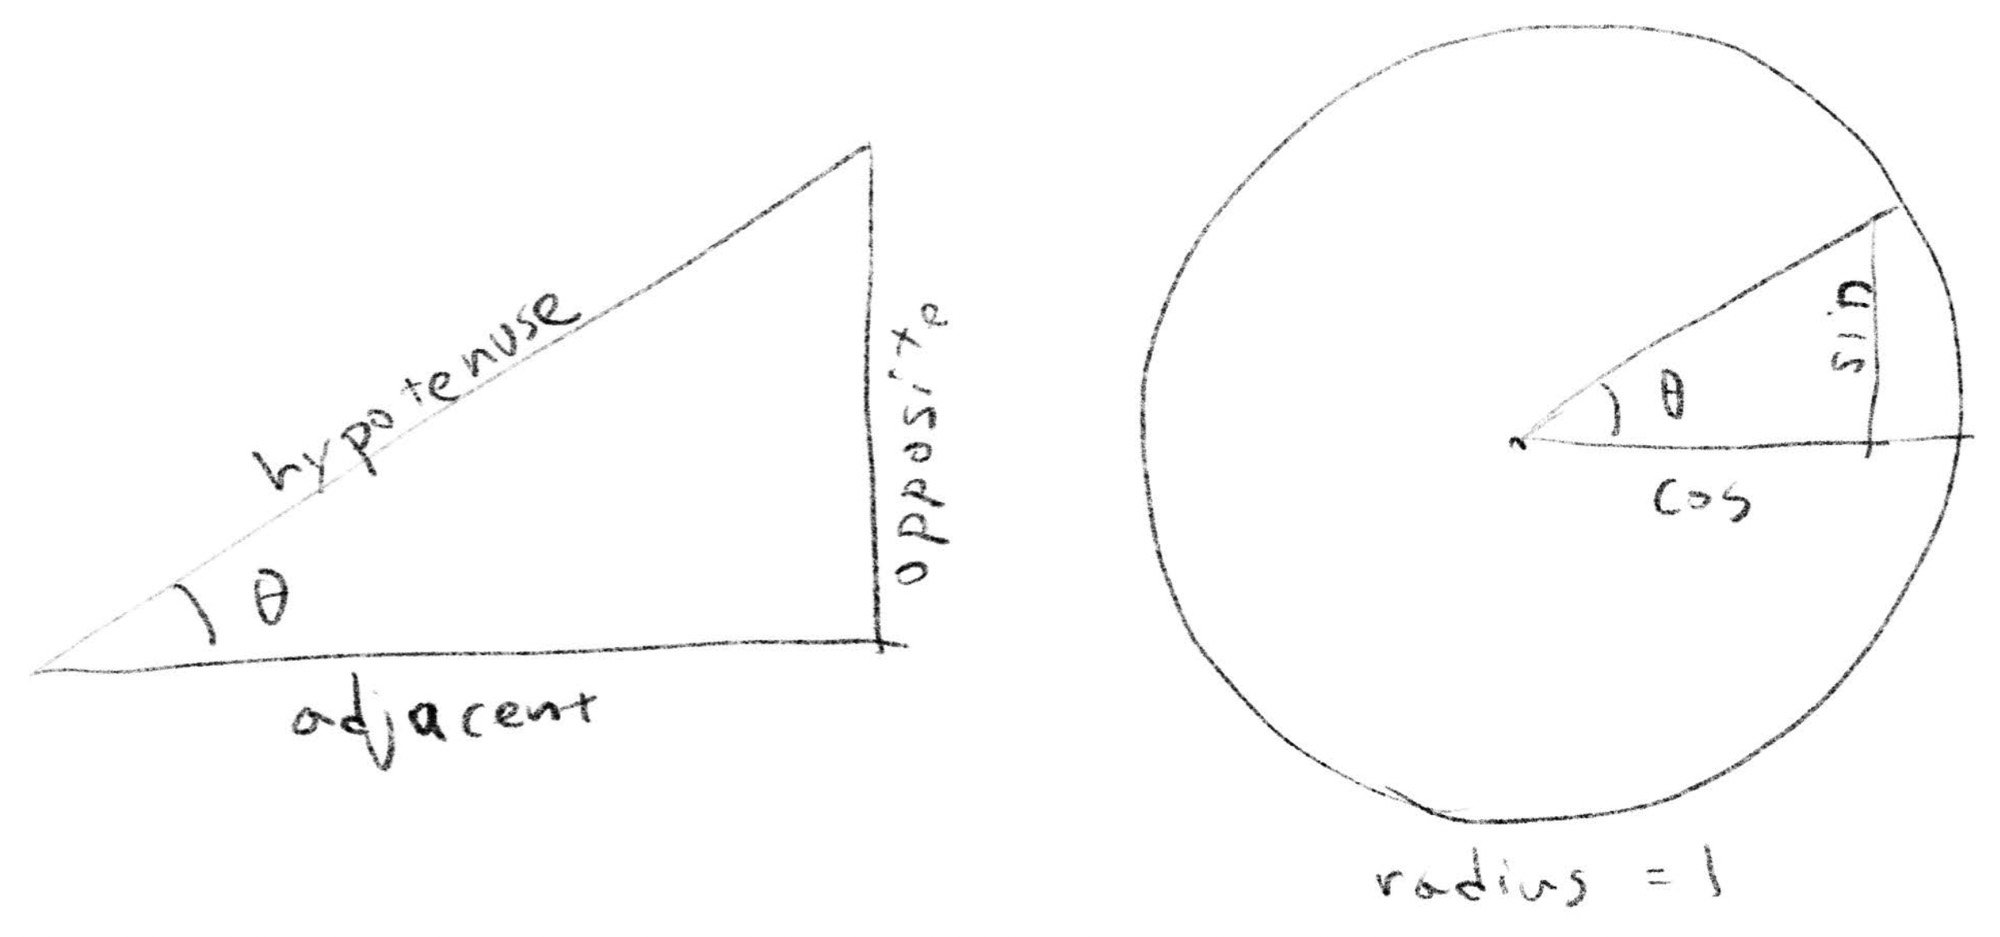
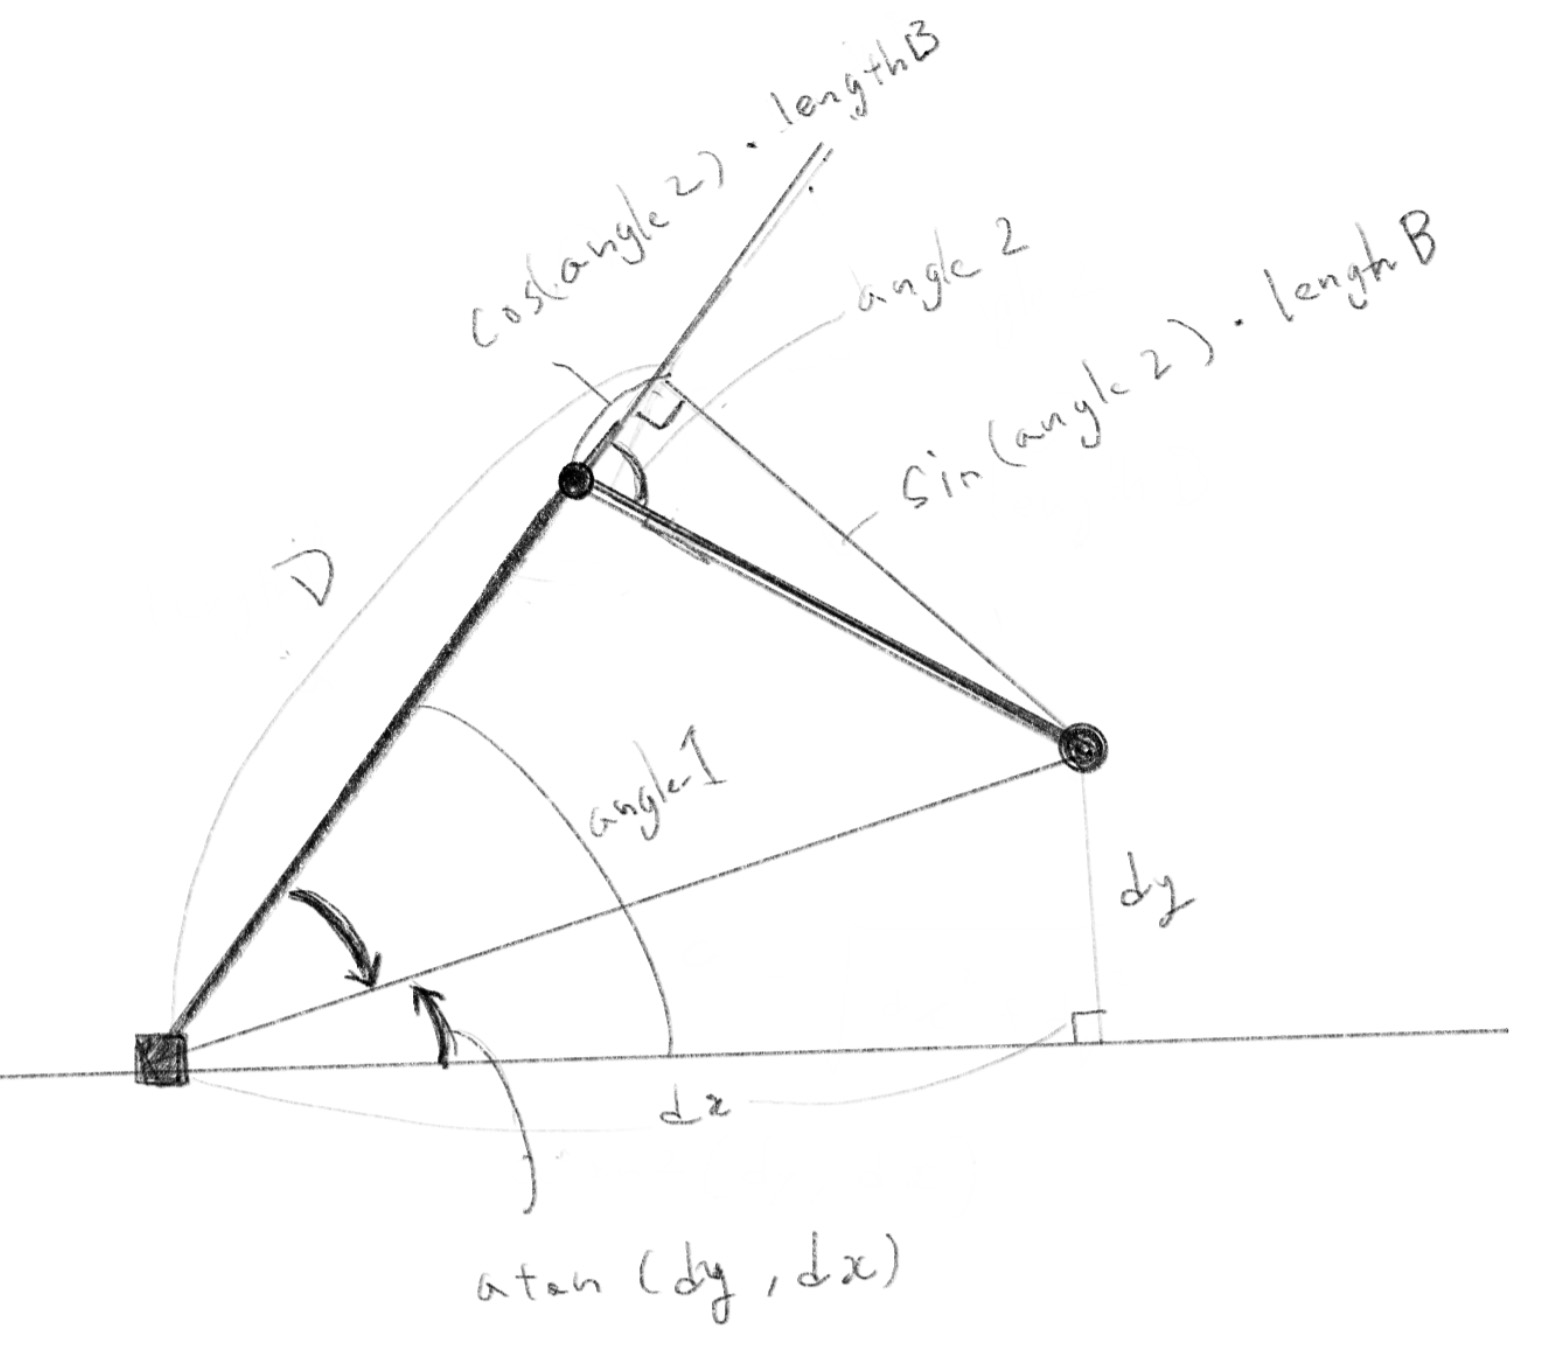
The angle of the upper arm can be also found using trigonometry. atan2 is a function that takes the lengths of the opposite and adjacent sides, and returns the angle between the adjacent side and the hypotenuse.
上腕の角度も、三角関数を使って計算できます。atan2は、対辺(opposite)と隣辺(adjacent)の長さを元に、隣辺と斜辺(hypotenuse)との間の角度を返す関数です。
let D = upperArmLength + lowerArmLength * cos(angle2);
let angle1 = atan2(dy, dx) - atan2(lowerArmLength * sin(angle2), D);
The picture below may seem a bit messy, but can you identify two arrows indicating angles and two right-angled triangles containing these arrows? The angle of the upper arm, angle1, is the sum of these two angles. Note that the second line of the code uses subtraction because the directions of the two right triangles are reversed.
下の絵はややゴチャゴチャしていますが、2つの角度を示す矢印と、矢印を含む2つの直角三角形を見つけられるでしょうか。上腕の角度 angle1 はこの2つの角度の和になります。直角三角形の向きが逆なので上のコードの2行目では引き算になっていることに注意してください。
atanstands for “arc tangent”, which is the inverse of the tangent. The arc tangent takes the ratio of the opposite and adjacent sides and returns the angle. The functionMath.atan()in JavaScript does exactly this. But because it is often more convenient to provide both the opposite and adjacent sides in practice, many languages implement the equivalent of theatan2function we used above.
atanは arc tangent の略で、これは tangent の逆関数です。arc tangent は、対辺(opposite)と隣辺(adjacent)の比を取り、角度を返します。JavaScript のMath.atan()関数がこれに対応しますが、実用上は対辺と隣辺の両方を指定する方が便利なことも多いので、多くの言語では上で使用したatan2関数と同等な関数も実装されています。
Inverse kinematics with more segments
多くのセグメントを持つインバースキネマティクス
It becomes much more complex when there are more segments than two, but the method we used for the two segments case can be still applied as a basis. There are many potential ways to solve this, but the example below is a demonstration of a method that I think is easier to follow among them.
セグメントが3つ以上ある場合はずっと複雑になりますが、2つのセグメントの場合に使った方法が基礎として応用できます。前述の通り様々な方法があり得ますが、下はその中でも比較的わかりやすいと思われる方法のデモです。
The arm in the demo has three segments, and the basic idea is to reduce this to the two segment cases by assuming a posture for the third segment.
デモのアームにはセグメントが3つあります。基本的な考え方としては、3つ目のセグメントの姿勢を仮に決めることで、問題を2セグメントのケースへと簡略化します。
For this method to work, we need an initial posture before moving the arm. The initial posture is shown in the demo with the faintest line. Below is an illustration of what is happening in the code.
この方法を使うには、腕を動かす前の初期姿勢が必要です。初期姿勢はデモの中で最も薄い線で示されています。以下は、コード内で何が起こっているかを示す図解です。
Step 1: We need to make some reasonable assumption for the posture of the third segment. This is somewhat arbitrary, but let’s imagine that the absolute angle of the segment on the canvas (not against the segment it is attached to). With this assumption we can calculate the posture of the first and second segments.
ステップ1: まず第3セグメントの姿勢について、何か筋の良い仮定をする必要があります。やや恣意的ですが、キャンバス上でのセグメントの絶対角度(直前のセグメントに対する相対角度ではなく)を想定してみましょう。この仮定を元に、第1セグメントと第2セグメントの姿勢が計算できます。
Step 2: Another good assumption is to use the original relative angle of the third segment. We can apply this the posture from the previous step, then adjust it so that the end of the arm touches the target.
ステップ2: もう1つの筋の良い仮定は、3番目のセグメントの相対的な角度を使うことです。これを前のステップで求めた姿勢に適用した上で、アームの先端がターゲットに触れるように調整します。
Step 3: As the last step, we can blend the results from the step 1 and 2 for the third segment to determine its final pose, then update the first and second segments accordingly.
ステップ3: 最後のステップとして、ステップ1とステップ2の結果の間を取って、第3セグメントの最終的な姿勢を決め、それに応じて第1セグメントと第2セグメントを更新します。
As you can see, this method is based on very rough assumptions, and the result can sometimes be a little off. But this is often good enough for character animations that do not require perfect accuracy. This is especially true when updating the posture every frame. As you can see in the next demo, the defect becomes almost unnoticeable.
見ての通りこの方法はかなり大雑把な仮定に基づくので、結果が少し理想からずれることもあります。ですがこの方法は大抵、完璧な精度を必要としないキャラクターのアニメーションには十分です。特にフレームごとに姿勢を更新する場合、次のデモで見られるように欠陥はほとんど気にならなくなります。
The last demo lays out many arms in a row similar to the earlier forward kinematics example. The power of inverse kinematics is that we can control fairly complex motion with only one or few control points, or effectors.
最後のデモでは、以前のフォワードキネマティクスの例と同様に、多くのアームを一列に並べて配置します。 インバースキネマティクスの利点は、1つまたは少ない数の制御点(エフェクター)だけでかなり複雑な動きを制御できることです。
To learn more
もっと学ぶために
All the examples on this page are in 2D. The same ideas can apply to the 3D space, but adding an extra dimension and more degrees of freedom makes the problems more complex.
このページのすべての例は2Dです。3D空間にも同じ考え方が適用できますが、次元が増え自由度が高くなるため、問題がより複雑になります。
We also often need to consider some constraints. For example, the joints in the real world can only move within a certain direction and range. Interestingly, constraints can sometimes make the problems simpler, reducing the range of possibilities we need to consider.
何かの制約についての考慮が必要な場合もよくあります。例えば現実世界のほとんどの関節は特定の向きや範囲の中でしか動くことができません。面白いことに、制約が問題を単純化し、考慮する必要のある可能性の範囲を狭めてくれることもあります。
As mentioned earlier, there are many different methods for solving these problems, especially for inverse kinematics. Here are some materials I found from the internet.
前述の通りこれらの問題、特にインバースキネマティクスには数多くの異なる解法があります。下記はインターネットから見つけた資料です。
-
About Inverse Kinematics(IK) (Japanese Only) - The IK method I introduced on this page is based on this article I read while ago
Inverse Kinematics(IK)について (日本語のみ) - このページで紹介したIKの手法は、前に読んだこの記事を元にしました -
Intelligent Motion Laboratory - Chapter 6. Inverse Kinematics